🔧 Elevate Your 3D Printing Game!
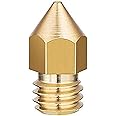
The Creality MK8 Thread Extruder Nozzle 0.8mm is a high-quality brass nozzle designed for the Creality Ender 3D Printer. With an input diameter of 1.75mm and an output diameter of 0.8mm, it ensures leak-proof performance and smooth filament flow, making it ideal for various non-abrasive materials like PLA and ABS. Weighing just 5g and featuring engraved size markings, this nozzle is both lightweight and user-friendly, perfect for enhancing your 3D printing experience.


| Brand | 3idea |
| Manufacturer | Creality 3D |
| Model | END3-PRO-NZL-0.8 |
| Product Dimensions | 0.6 x 0.6 x 1.3 cm; 5 g |
| Item model number | END3-PRO-NZL-0.8 |
| Operating System | Spare Parts |
| Printing Technology | Spare Parts |
| Compatible Devices | Laptop, Personal Computer, Smartphone |
| Mounting Hardware | 1 |
| Number of items | 1 |
| Batteries Required | No |
| Connector Type | usb |
| Material | Spare Parts |
| Manufacturer | Creality 3D |
| Country of Origin | China |
| Item Weight | 5 g |
N**D
Original Ender PEI coated magnetic spring steel bed
This is a genuine Creality Ender PEI coated spring steel bed, the performance is exactly the same as the one that comes with the Enser 3 S1 pro. Adhesion is reasonably good at heated temperature and prints self-release almost 99% if not completely as the temperature returns back to room temp. The caveat being in case of power failures, although the printer can resume, the cooling down causes the print to release making auto-resume useless. I'm back to using glue sticks for large or critical prints. The glue washes off easily if I want to use the PEI surface as-is too.
M**I
Not working, wastage of money,
Don’t buy this product from amazon, motherboard is not working nor they are replacing the product. Wastage of money, energy & time.
M**L
Black magic at work here
Upgraded from v1.2 to this and all the steppers in my printer went dead silent!Print speed and quality seem to have improved and I see a lot less visual defects in my print.So much so that I can now run it overnight without any worries of sound or failure or any drop in quality.
S**J
Works fine
Had purchased it for a special hobby project. Works fine.
A**I
good product
I love this thing! It was a great intro to klipper. It can be slightly frustrating due to the lack of certain details in the setup process, but since the newest firmware update it has been much easier. It now allows for 4 printers and has most Ender 3 and 5 models. It takes the work out of building config and firmware files. If getting into the deeper side of 3D printing is what you want without going the Raspberry Pi or Linux route, this is the way. Only slight negative is it’s not quite as open source as I’d like.
S**K
Ok
Seems like there was some extra films because the package was kind of opened before the packed as you can see on the last image, they reduced and sold in the same cover, by the way it is okay, i got the film on time and was good as the mentioned 3 on the package as well
D**
Damage product
The media could not be loaded. Product is damaged returning
S**K
Compatible with ender 3 v3 se
Both sides are printable. High quality. Great adhesion no need for glue stick
P**S
Exelente artículo pero revisa tu versión de tarjeta madre
Tengo la ender 3-pro dese hace un par de años, ha funcionado bien pero me dio por conseguir nuevas cosas para mejorar su rendimiento. Compré este nivelador automático e investigando un poco me dí cuenta de que la versión de mi tarjeta madre es V.1.1.4, seguro en el manual viene esa información, o puedes abrir la tarjeta madre quitando los 3 tornillos de abajo y uno de arriba (es en la que metes la micro-USB) y una vez abierta puedes ver la versión de tu tarjeta al lado del logo de Creality.Ya con la nueva tarjeta instalada funciona de maravilla y es muy fácil de instalar ( con algún video en línea)
K**R
Great results, if you do EVERYTHING properly
The physical installation was simple enough. The video guide posted here was very good, and it only took a few screws (and a relatively scary plug pull) to install. You do have to unplug your Z-axis limit switch from the board to install this thing, and unfortunately it's hot-glued on most units. The best way I found to remove it was to gently pry it from both sides to wriggle it loose carefully.One thing they don't tell you, however, is to make ABSOLUTELY SURE of your particular motherboard's model number/version. There is no way to determine this from outside of your printer or in your menus, only by looking at your actual board. I would recommend taking several very clear pictures of your board, while installing the data cable. This is crucial, as you need it, in order to install the correct drivers. Fortunately, installing drivers is piss easy, with the SD card and adapter that comes with your printer, and incorrect drivers *shouldn't* brick your printer. If you install the wrong version, the printer will still work, and it will still *attempt* to auto level, but it will not actually commit the leveling data (mesh) to memory, and your results will really suck, no matter what you do. You'll also need to modify your G-code in order to tell your slicing software (Ie: Cura) to do a fresh auto level before every print. It only adds a few minutes to each print. Search around for good G-code instructions, and simply copy-paste them into your printer settings in Cura. They'll save automatically (be sure to copy the old instructions to a notepad file, and save them somewhere you won't lose them, such as the folder you store your STL files in)This also doesn't exempt you from leveling your bed, ever again, BUT it does help significantly with warped beds, and the like. Plus, you won't need to level your bed NEARLY as often.Setting your Z-axis offset takes some getting used to, but don't give up! Watch a few videos concerning the subject, and run a series of bed level calibration prints, until you get satisfactory results. Once it's set correctly (of course, don't forget to preheat your bed) you should be able to get serious improvements, especially on prints that take up a large area on your build plate.It takes a bit of work, and can be a little frustrating to set up, but if you go into the process willing to research, take your time, and learn, your printer will be significantly better for it!
A**R
Works extremely well... the instructions don’t!
This was installed on an Ender 5 Pro with the newest main board in it. It has the connector for this built into it. You need only remove your “Z home” sensor and plug this into the main board and download a small script file that modifies the firmware on your main board and you are ready to go!It’s quite easy to do and follow the instructions... IF you can actually see the instructions. They are printed on such a small fold out piece of paper that they are truly difficult to read. The font is really too small to read. I can see where people mess up the installations because on not being ABLE to read the instructions properly. PRO TIP... Download the instructions in PDF so you can read them. Soooo much easier and you won’t skip that hidden step. It’s quality paper they’ve used and quality printing in color but SOOOOOOO small. Unprofessional.As far as working... This does an incredible job. It provided clearly much much better printing results the very first time I used it. It is worth its weight in gold! You will not be disappointed.Creality.... get your head out of the sand and redo your manual!!!!
A**ー
ゴミです
この商品を使用してからプリンターの調子が悪くなりました。
V**O
Excelente! Pero checa compatibilidad
Con este añadido ya no inviertes tanto tiempo nivelando, pero no olviden revisar compatibilidad con su impresora.
Trustpilot
3 days ago
2 days ago