⚡ Upgrade your desktop storage with speed and style!
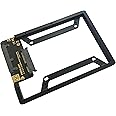
The Fenlink 2.5" to 3.5" SATA Drive Converter enables seamless installation of 2.5" SATA HDDs or SSDs into 3.5" desktop bays, supporting SATA III speeds up to 6Gbps. Its aluminum alloy open-frame design promotes superior heat dissipation, while the Immersion Gold PCB ensures stable and reliable data transmission. Compatible with a wide range of desktops including Apple Mac Pro models, this converter is a sleek, durable, and efficient solution for maximizing your storage potential.
| Hard Drive | 3.5 GB Solid State Drive |
| Brand | Fenlink |
| Series | FL1510 |
| Item model number | FL1510 |
| Item Weight | 3.84 ounces |
| Product Dimensions | 8.7 x 5.4 x 1.3 inches |
| Item Dimensions LxWxH | 8.7 x 5.4 x 1.3 inches |
| Color | Gold |
| Flash Memory Size | 3.5 GB |
| Hard Drive Interface | Serial ATA-600 |
| Hard Drive Rotational Speed | 7200 |
| Manufacturer | Fenlink |
| ASIN | B01ELRRKW8 |
| Country of Origin | China |
| Is Discontinued By Manufacturer | No |
| Date First Available | April 21, 2016 |
A**L
A Solidly Built, Top Tier Hard Drive Adapter
The Fenlink SSD/Hard Drive Adapter is incredibly high quality in terms of materials. It actually feels more high quality than some of what’s in the iMac in terms of the connectors Apple chose, which are generally very brittle. I have a late 2010 i7 iMac 27”, and a late 2018 i7 iMac 27”. Since the late 2010 iMac is larger in terms of depth, it’s much easier to work with internally, and this was used to add a 960GB SSD, as well as a secondary 2 Terrabte traditional laptop sized hard drive where the disc drive used to be.While the 2010 iMac doesn’t support the fastest SATA data speeds, the increase in speed overall is phenomenal. The start up times are 20 seconds, and outside of loading complex audio plugins in GarageBand on an initial program boot, the last supported version of Logic Pro for OSX High Sierra starts up in 8 seconds. Compared to the 2018 iMac, which takes 3.5 seconds to load Logic Pro, as well 10 seconds to boot into a clean install of OSX Catalina, the boot times for the 2010 iMac are impressive.Installing the Fenlink SSD/Hard Drive Adapter requires an iMac repair kit with dual suction cups to remove the protective glass frame, as well as a PC screw driver kit with set of Torx skrew driver bits to unscrew the LCD panel. Once you do that, you have to be very careful with removing the very short cables such as the V-Sync Cable, and the LED Light cable, as well as the LCD Monitor, and the temperature sensor cables that need to be removed to fully lift the LCD panel away from the iMac Logic Board. The environment should also be fairly sterile and static free, to prevent dust from getting on the glass that protects the iMac LCD panel. For anyone that’s not well versed in computer building or repair, it’s not like simply replacing, or adding a hard drive in a tower PC, or HTPC build. You need to have a complete OSX Time Machine backup, or an external drive with the latest supported version of OSX ready to install when you boot up the iMac with the new hard drive.The other important thing to note is that all current hard drives have internal temperature sensors. Once you remove the original iMac hard drive, the original sensor cable will not work on the new SSD because the extra sensor port on the new, non Apple supplied hard drive isn’t present. Once a clean copy of OSX is installed, if you’ve added an SSD, you’ll see an insane speed boost, but then you’ll hear a very loud, persistent fan noise shortly after that. Apple tends to like to run all of thier computers at high temperatures due to how thin they make them. This means that both the Intel MacBook Pros and iMacs typically don’t allow for boost clock CPU speeds to occur. This problem was well documented and present even on the first release of their extremely expensive 2019 i9 MacBook Pros. The stock temperatures were so high that it throttled the i9 CPU to a point where it ran much slower than the significantly cheaper i7 MacBook Pro model that was just bellow it in terms of specs.To address the issue of the loud fans once your SSD or traditional hard drive is installed on an older iMac, all you need to do is buy the relatively cheap HDD Fan Control app. Given that I replaced the original hard drive and the disc drive, none of the thermal sensor cables work. HDD Fan Control is able to read all of the internal SSD and traditional hard drive sensors, and it actually has an included profile to prevent thermal throttling. Before that, with the original iMac 2010 hard drive, on a clean install of High Sierra, in a well ventilated space, with no dust inside the iMac, on idle, the iMac was at 65 degrees Celsius. With Photoshop, iTunes, and Firefox open, it would hit over 95 degrees Celsius at times. After installing both new hard drives, and using HDD Fan Control, the iMac is still very quiet, and it’s idling at 44 degrees Celsius, and on load, it’s 60 degrees Celsius. Even with a high CPU load, the internal fans are barely audible. On my 2018 iMac, without any modifications, or HDD Fan Control, it’s 50 degrees Celsius on idle, and 80 or more on load, largely because the case is razor thin by comparison. My i7 9700k Nvidia 2080 Super PC build, clocked at 5.5ghz, runs at 22 degrees Celsius on idle, and 55 on load, so the high Mac temperatures really aren’t ideal at all. In a strange sort of way, upgrading the ram to 32GB, which the late 2010 iMac 27” can take, despite saying its limit is 16GB, adding the SSD, and another hard drive that’s setup for iTunes and Logic Pro sound libraries, as well as a cache for Photoshop and music programs, then having HDD Fan Control, the iMac feels almost as fast as the 2018 iMac.In closing, if you know what you’re doing, and are comfortable with working on a Mac or PC, the Fenlink SSD/Hard Drive Adapter is incredibly high quality in terms of its solid materials and metal frame. Installing it has breathed new life into my iMac.
A**R
Positions the SATA Connector Correctly
Does what it's supposed to do. It allowed me to replace the 1TB 3.5" mechanical HDD in a 12-year-old Cavalry external drive enclosure. Weight, heat dissipation and power consumption were reduced; access speed and reliability were increased.I don't remember if I found this in other reviews before purchasing, but the frame of the adapter is not plastic. It's actually powder-coated cast aluminum, or some alloy thereof. It's sturdy but also quite heavy. Not as heavy as the 3.5" mechanical HDD that it replaced, but it definitely weighs more than the SSD itself.There are 8 screws included in the package and no instructions, so to clarify for anyone wondering:The washer-head screws are metric (M2.5 or M3, I believe) and secure the SSD to the frame. The pan-head screws are #6-32 and attach the frame to whatever mounting points would have secured the old 3.5" mechanical drive in the computer chassis. All of the mounting points of a 3.5" drive are retained, which contributes greatly to ease of installation.The fit is exact and, as others have pointed out, this adapter positions the SATA connector in the same place it would be on a mechanical hard drive. This is critical if you're replacing a drive that plugs directly into a connector without cables.This would probably not work for those "tool-less" hard drive bays that pop the drive out when the door is opened (such as in a server or NAS device), since those rely on the thickness of the HDD as well as its length and width for the lever mechanism to engage properly.
P**P
Help fit a new SSD drive in an old 2013 HP Touchsmart Pavilion model 23-f261
I used this to help upgrade my sister's HP Touchsmart Pavilion model 23-F261 desktop computer from 2013. Her computer was running slow and after checking what taskmaster showed me confirmed my suspicion. 1 she only had 4gb of ram and two she was running an old style spinning platter drive. A western digital 1tb blue drive to be exact. After upgrading her ram to 16gb up from 4gb I then needed to install a new western digital 500gb sata ssd drive. The hard drive cage that came in the case was not designed to hold an ssd drive. Thats where the Fenlink 2.5 to 3.5 drive converter saved the day. The ssd drive fit the drive converter perfectly and then the drive converter fit into the hard drive cage that came in the computer. Then I just installed the old hard drive cage containing the new Fenlink converter which was holding the new ssd back into the computer and that is it. I must mention i copied or "cloned" the old hard drive to the new ssd with Acronis software. Very easy! My sister did not have much on the 1tb drive so i could get away with cloning in this case to a smaller drive. My sister does not game. She uses this computer to order stuff, research things, finding recipes, email, things where there is still a lot of life left for this old machine. So 12 bucks for the Fenlink converter, 60 bucks for the ssd, and 60 bucks for the 16gb memory kit and 132 dollars in total, I would say it was well worth it. One the computer is snappy again, and 2 we didn't send a computer to a landfill. Great converter i would definitely buy again. Take care.
N**2
Great Quality
This is a great high quality product. It worked very well for my needs.
A**K
I bought this because how well it works for me, except now they have cheapened it.
I initially purchased this product because of its high quality and effectiveness, but now the company has started making a cheaper version of the same product with lower quality materials, which is disappointing to me. The attachment screws are now too short because they made the product rails thicker. I compared my latest purchase to an earlier one that I got, and I like the original one better. It is just the mounting of the SSD that is different now because the screws have to be changed out. They could have included better fitting screws. Better yet would be to offer this product at half the price to compensate for this defect.
Trustpilot
2 months ago
1 month ago