💖 Nail Art Made Easy: Unleash Your Inner Artist!
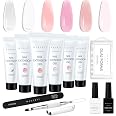
The Makartt Poly Nail Gel Kit offers a comprehensive solution for nail extensions with 6 clear and pink gel colors. Designed for both beginners and professionals, this kit ensures long-lasting results, allowing for creative designs and easy application. Ideal for various occasions, it’s the perfect gift for nail art enthusiasts.


E**N
Great it for beginners!
The media could not be loaded. *cracks knuckles* buckle up for an unnecessarily long but hopefully very thorough & helpful review.1. This kit doesn't include absolutely everything you need in order to due your nails. Separately, you'll need to buy: a uv/led lamp & a slip solution. For the uv/led lamp, there’s many great options on here which is where I got mine. As for the slip solution, you can buy them online or you can just use rubbing alcohol like I do (it works the exact same & most people already have this in their house).2. There’s definitely a learning curve, don’t be disappointed or upset if your first set isn’t perfect! I got this kit at the beginning of February (about 6 months ago) and I still have a LONGGG way to go.3. Definitely try out the dual forms that are included in the kit, but if those don’t work out for you then try paper forms or tips. The dual forms are amazing for getting a super smooth top, however I had a lot of trouble with them when it came to polygel oozing our near my cuticles or at the tip of my finger. The dual forms while making the tops of my nails extremely smooth and glossy, made the undersides of my nails sooo thick & bumpy (even if I would smooth them out before curing). I’ve learned that I can somewhat use the dual forms to create ‘tips’ by putting the tiniest/thinnest amount of polygel in the forms, curing it, and then applying more polygel on top like you would with the other 2 methods.Paper forms are great for getting a super smooth underside but you made get a bumpier top of the nail. While having the top of my nails be bumpy is still annoying, I very much prefer it compared to a bumpy underside because with my drill I can fix them no problem. Basically it’s easier for me to file the top of my nails as opposed to the underside of them.Plastic tips and glue are probably the easiest option when it comes to actually putting on the polygel, however I just haven’t gotten around to buying any yet. With tips, they’re similar to paper forms because you’ll get the very smooth bottom but possibly a bumpy top. With tips you can already have set shapes which makes them that much easier because with dual or paper forms, you often have to create the shapes yourself.No matter what option you choose, they all have different pros and cons. Definitely try out and utilize the dual forms that come with this kit, but if they’re really hard for you (Like they were for me) then don’t be afraid to try paper forms or plastic tips. Don’t be afraid to experiment or even combine different options to find what works best for you.4. For me, it's much easier to just squeeze out and apply the polygel directly where I want it, instead of squeezing the polygel out onto the brush/spatula and then applying it to where I want. I find that because polygel is so sticky, the less surfaces it comes in contact with, the easier it is to spread and work with.5. Other items that you don’t need but make it a lot easier & more convenient to do your nails include: a nail drill/e file, lint free wipes, more nail files, cuticle pusher/trimmer, primer, and dehydrator. Having a dish for the slip solution & paper towels under your hands to collect dust or to the side to wipe your brush on are very helpful.Buying items not included in the kit is unnecessary but definitely worth it! For example, the drill/e file is a game changer. I got one off of here for like $20 from melodysusie (I think?). You definitely don’t need it (the file you get in this kit will work just fine until it wears down) but it makes a huge difference when shaping the nails & getting the bumps out on top of or underneath the nails. Not only will drill help to make your nails look even greater, but it'll also make the process of doing your nails so much easier and faster.Other unnecessary items (more for fun design elements) that you may want to purchase in the future include: rhinestones, fine & chunky glitters, holo powders, & gel polishes. Again all of these things are unnecessary and don't really have anything to do with this kit, but I think this might be nice advice for beginners to have.6. 'Natural Pink' is BY FAR my favorite color in this kit (it's the shade of all of my sets in the pictures and video). It's the perfect nude color for me, someone who has pretty fair skin. I loved it so much that I used up the whole tube from this kit and ended up buying the large tube of it. I think that all of these colors would look beautiful with any skin tones! The 'Clear' and 'Misty Rose' are great if you want to . have jelly nails. The 'Clear' is also amazing to cap any designs, glitters, etc. If you have gel polishes (once again not necessary) you can even mix them into the polygels to make custom colors or just apply the gel polishes on top of your already cured polygel nails.I hope this was somewhat helpful to people who are interested in this kit. Like I said, there's definitely a learning curve but it's so fun doing your nails and very rewarding to see yourself grow and get better at doing them!
D**A
Satisfied
🤩🤩🤩
Z**Y
A little goes a long way
The media could not be loaded. You don’t realize how small the tubes are until you see them but they still hold enough products to do multiple sets/designs. It was a bit sticky at first but I just had to adjust to using more alcohol. I’ll def be purchasing more sets/colors
M**A
Ease to use
Non sticky easy for removal, color Quality
Z**K
Nope. Doesn't dry like others
It works but this brand is not as good as others. It takes longer to dry under the light. It's really sticky and even when it's dry it's still soft. I had to start over so many times because the product wouldn't stick too.
A**R
Quality
Very good material long lasting if applied accordingly
A**R
Not worth it :(
Was so excited to try this method after watching all the online videos but it took me 3 hours for one set and another 2 hours for removal. I usually grow my natural nails out and do 5 coats of soak off gel polish but wanted to go for a jelly nails/see through design.The gel had tiny bubbles before and after curing which really defeated the purpose of being able to do jelly nails. If you have any nail growth you will definitely be able to see it through all the colors except the white.Using 91% alcohol is too strong and will leave white cloudiness underneath and 70% has the same effect if you touch the brush to the gel too many times. This doesn’t leave much room to manipulate the product especially if you are sculpting them to be really long as you would with stilettos.They were thoughtful with the brush and the plastic tube it comes in because once it gets sticky it’s so much effort to remove. Very aggravating if you like to keep a clean station. Be aware that wiping the gel off of the spatula or anything that it gets on is tricky with one hand, have plenty of paper towels/lint free wipes and alcohol ready to go right in front of you.Duals forms come sorted sizes 0-11 in a plastic case. The dual forms fit my middle through pinky fingers great but my pointer fingers and thumbs which are more curved and flatter respectively were so hard to fit side wall to side wall. Also the curve on my thumbs were so off even after I filed and shaped both my nails and the dual forms prior. Would have been better off free-handing with a paper nail form.The 2 hour removal...here we go...I used an e-file and the provided hand file from the kit then a warm acetone soak. You definitely need a particle mask and dust collector machine or at least do the filing outside. This would be a huge mess for the average consumer and if you make a mistake on one nail it would be such a pain to remove it and fix it, I was extremely careful not to. I used three coats of soak off gel basecoat since I didn’t want to file close to my natural nails and I am so thankful I did. I would be cringing at the removal if I had to scratch any of my natural nail plate which happens no matter how professional you are. The polygel just gets soft and bendy in acetone if you were wondering, must be filed paper thin to make removal go faster.To sum it up- pretty colors and if you already like Makartt Polygel get this. Otherwise the application and removal is too much of a hassle and I don’t see myself taking the time to perfect it. Also my nail beds would be crying if I did this with back to back removal and application.Makartt should include paper nail forms or more dual form sizes for flatter/smaller nail beds.Decided to not post a picture because the bubbles are embarrassing. Worst set I’ve ever done. I would return this if I could.
E**Q
The SOLUTION to blotchy white nail polish - Great Value for money
The white is a pure solid bright white and goes on flawlessly!I have for the life of me never been able to get white nailpolish go on smoothly- Problem SOLVED! INSTEAD put on a permanently white nail with solid POLYGEL nailbuilder. And dual forms gives it that smooth top -a professional finish.This kit comes with EVERYTHING you will need (except slip solution or alcohol- be sure to get that.)It is GREAT value for money.I loved the flatter nail forms which fit my nails better.The tool /brush is high quality and the nail file was much appreciated! The tubes are small.If you are cheap or just want to try it out for cheap- you will be pleasantly surprised with this HIGH QUALITY kit!I think this was so far my BEST PURCHASE on amazon ever. The Black Friday deal slashed almost $10 off!It is surprisingly hard to squeeze the product out of the tube -is the product supposed to be that stiff? I’m new to polygel. It was hard to press it into the nail form too until i got the alcohol/ slip solution going.I struggled much more than the average bear but got it done!
Trustpilot
1 week ago
3 weeks ago