
DOWNLOAD THE APP


Customer Services
Copyright © 2025 Desertcart Holdings Limited
DOWNLOAD THE APP


🎮 Upgrade your Switch, upgrade your game — stand out with Atomic Purple!
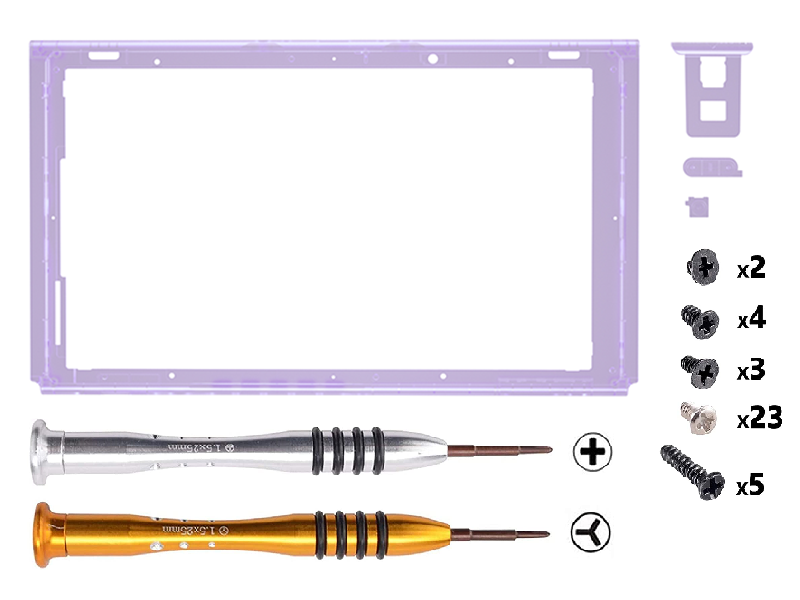
The eXtremeRate Clear Atomic Purple DIY Housing Shell is a premium replacement front cover for the Nintendo Switch console, designed for experienced DIYers. Made from durable ABS material, it features a vibrant transparent purple finish and includes all necessary tools and spare screws. Installation is supported by a detailed YouTube video guide, ensuring a precise fit and restoring both aesthetics and functionality, including volume and power buttons.


| ASIN | B08N5TKV69 |
| Best Sellers Rank | #10,912 in Video Games ( See Top 100 in Video Games ) #50 in Nintendo Switch Skin & Protector Sets |
| Customer Reviews | 4.5 4.5 out of 5 stars (465) |
| Date First Available | November 10, 2020 |
| Item Weight | 1.06 ounces |
| Item model number | VEP311 |
| Manufacturer | Extremerate |
| Product Dimensions | 1.97"W x 1.97"H |
M**Y
Just take your time
Everything seems about perfect for me. I actually used the included screwdriver(s), even though I already have a few sets. I watched a video on YouTube on my tablet while I did the installation. I had to rewind and pause the video a couple times but I just took my time and didn’t break anything. I also have years of experience disassembling electronics so I’m sure that might have helped. People who complain about the screwdrivers don’t understand that you have to apply pressure while unscrewing those screws or they most likely will strip. The only part that confused me was which way to put the power button in. It seems like I got it though. The switch looks great and some people think it’s a limited edition. I used a blow dryer to heat up the edges of the screen and used the included suction cup to pull it out. Once again, you have to take your time. This is really a must if you have replaced the backplate because it looks kinda dumb just to replace the backplate and the front plate is still black. I ordered the front and back at the same time. It takes a little over an hour to complete. The only real problem was the kickstand.: I had to soak it in hot water from my Keurig to soften it up so I could straighten it out because it was warped, but after I was done it was fine. Both kits included a whole set a screws and a really nice screwdriver(s).
W**Y
Quality product, clear concise directions
My Switch, which I purchased at launch, has been through the ringer - multiple moves, kids and various drops and falls. The shell was broken in multiple places and the left side controllers weren't connecting or charging when attached. I spent a little over an hour installing this product using the YouTube video provided on their website. All the tools needed were included as well as extra screws in case any from the original equipment were missing (several were, in my case), with the reception of a heat gun, though a hair dryer worked just fine. Once installed (along with the back plate which I ordered from the same company) not only for the Switch feel like new, but the controllers were syncing and charging again, presumably due to a loose wire or something that was fixed during the installation. All in all, 10/10, no issues, clear directions, a great product.
A**G
Easier than other reviews have stated, very straightforward with excellent results
Pleasantly surprised by this kit. I read over the reviews first and saw lots of complaints and was concerned it would have quality issues or the disassembly would be tedious (it does involve a heat gun to remove the digitizer after all). Nope! Followed their youtube video and it was painless. I already have my own electronics tool kit though so I have no comments on the included tools with this kit (or the joycons + back panel, dock, or pro controller ones either). Suction cup was included so that was convenient. I also got the LED firefly and button kits but they weren't here yet and I was impatient so it's pictured above without. Disassembling the screen can be tricky if the tape refuses to let go. I used a hairdryer on low instead of a heat gun - it had a better nozzle and low heat is plenty. Just go slow over one side at a time and gently pull it free. A spudger carefully applied can lift it out but make sure it's heated up enough first. Keeping all the parts laid out on a mat where I was working in roughly the same positions they got removed from, layer by layer, made reassembly even faster than disassembly. A good pair of tweezers or two really help it along. Total install time for all of the kits in one go was about 5 hours (front and back shells, joycons, dock, pro controller + led upgrade). Lots of screws are included but they seem to be backups and replacements only. The only ones I used replaced the annoying tri slot screws on the outside of the case with standard phillips ones for later access. I wish extremerate offered all their colors for the front panel. I have a second switch I want to do in transparent blue but it's not available yet. However this makes a fine addition to my growing collection of atomic purple electronics (pictured) and I'm quite pleased for how cheap the shells were.
J**R
exactly as advertised
My day-1 switch's original fan grille broke after a fall from a hotel bed - I put up with it for a while but already had the purple variant and figured I'd do both at once, so I went with this clear one. It was a perfect fit - easy enough to install and felt great, especially with a glass screen protector. I put a sticker on the rear heatsink-cover assembly and it was still very visible through the plastic. 10/10.
N**L
The shell looks great, no complaints there! Just a word of warning, the front shell is a lot more labor intensive than the back shells or joycons. I learn this the hard way 😅
B**S
An awesome way to customise your switch, it's so easy to swap the back plate but only someone commited will swap the front half of a switch
N**L
Die transparente Front von eXtremeRate passt wie angegossen auf meine Switch. Ich konnte keinen Unterschied zum Original feststellen – super Qualität und absolut passgenau. Optisch ein echter Hingucker! Einziger Hinweis: Für den Digitizer musste ich neues Klebeband besorgen. Mein Verbesserungsvorschlag an den Hersteller: Bitte künftig auf allen vier Seiten der Front dort, wo der Digitizer aufliegt, einen schmalen Streifen 3M-Klebeband vormontieren. Dann wäre das Set absolut rund!
J**M
Great quality not for the casual player you need to know basic electronics and how to disassemble the switch there video is great tho
J**N
stom koste me heel veel geld
Trustpilot
3 weeks ago
5 days ago