Some deliveries may take a little longer than usual due to regional shipping conditions.

DOWNLOAD THE APP


Customer Services
Copyright © 2025 Desertcart Holdings Limited
DOWNLOAD THE APP
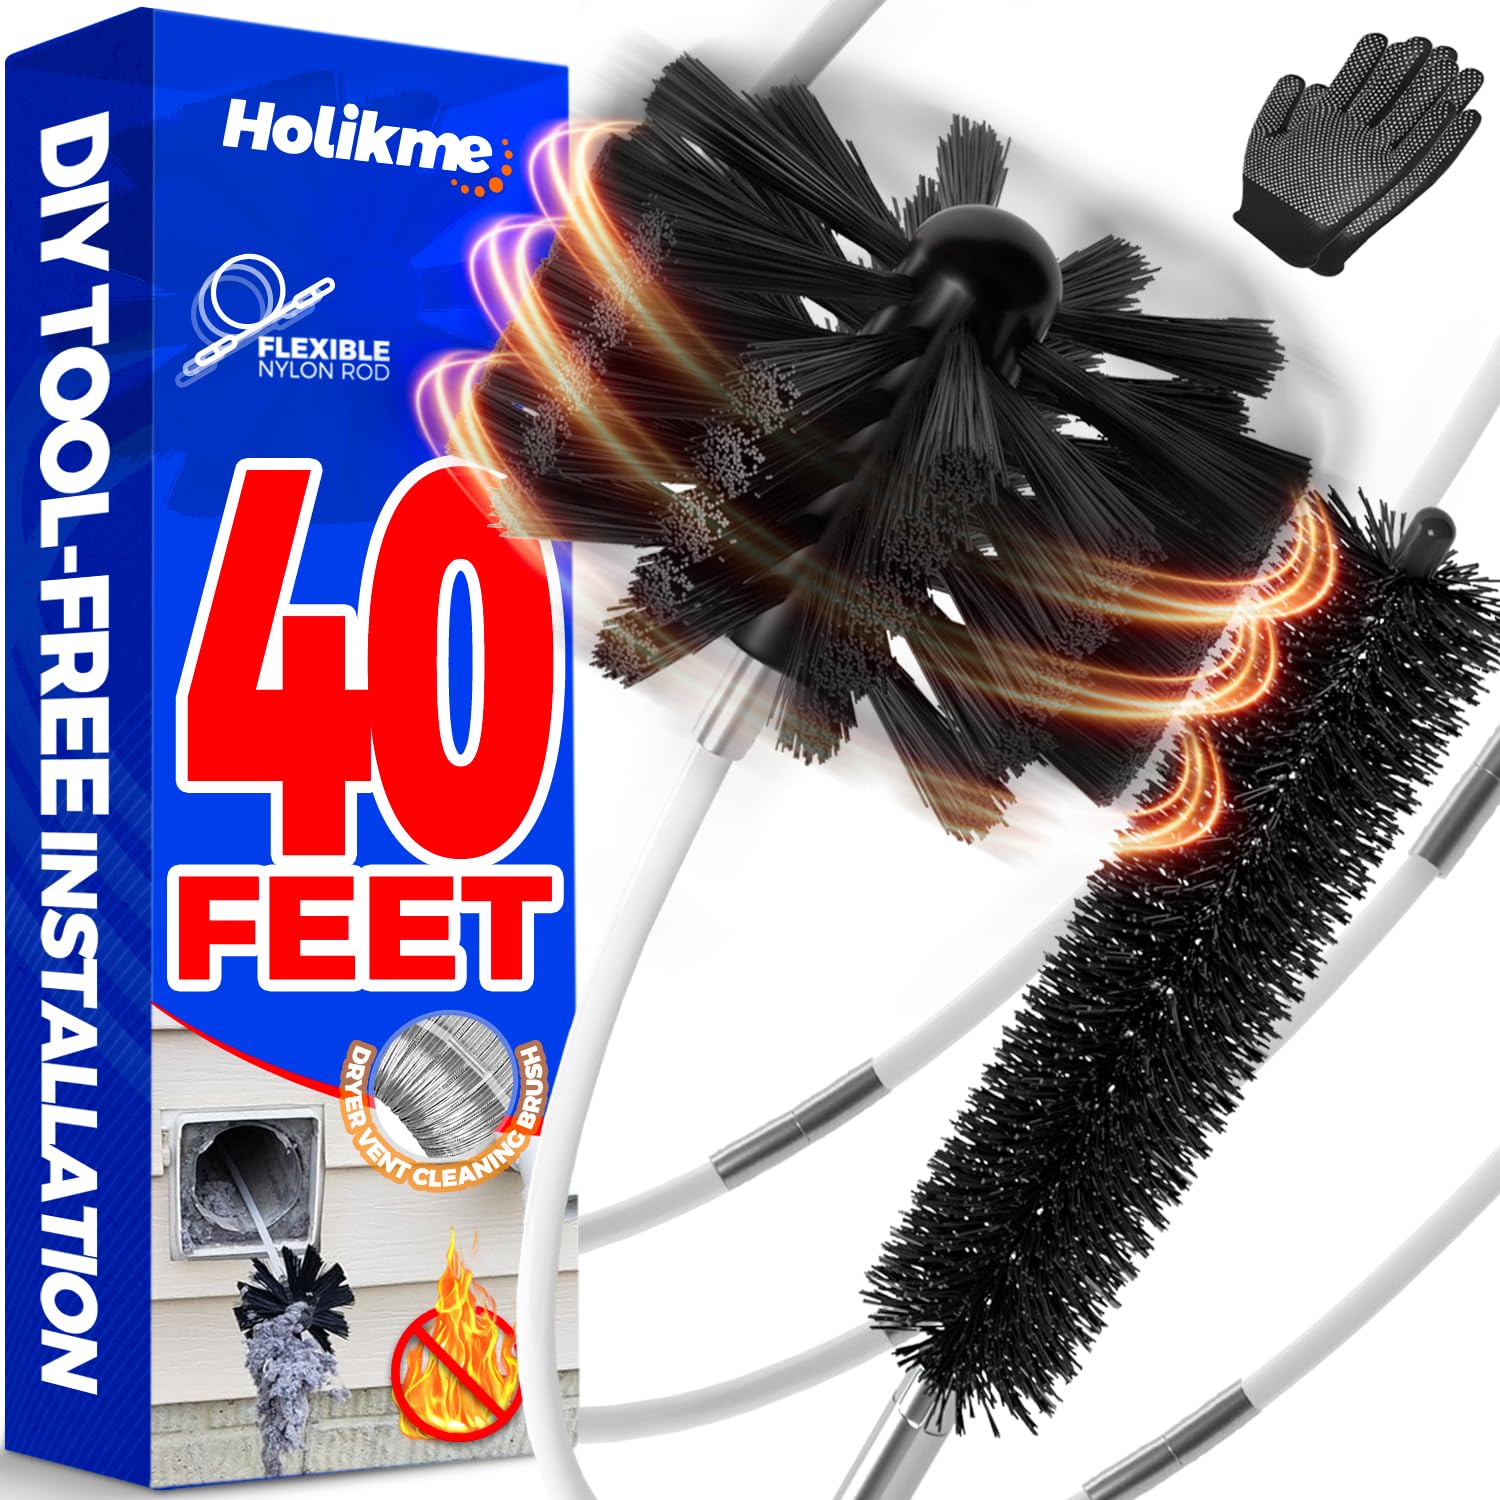
🔥 Clean vents, safer homes — DIY like a pro! 🛠️
The Holikme Dryer Vent Cleaner Kit features a 40-foot extendable flexible rod system with a synthetic brush head and drill attachment, enabling professional-grade lint removal from dryer vents. Designed for both manual and powered use, it improves dryer efficiency, prevents fire hazards, and saves costly professional cleaning fees.


| Material Type | Synthetic |
| Handle Material | Plastic |
| Item Weight | 16 ounces |
| Item Dimensions L x W x H | 3.9"L x 3.9"W x 480"H |
| Item Shape | Round |
| Color | Black |
| Special Features | Flexible |
P**O
Go Slow and it will do the job.
My dryer vent goes straight up thru the attic to the roof. I used this to clean it out and it worked fine. A couple of key points: first, go SLOW. Attach sections in increments of ONE, and do NOT assemble outside of the vent. Put on a section, gently move it up in the duct, then disengage the drill, add a section, re-engage the drill, repeat. Use the drill's slowest/lowest setting and gently move the brush up and down at various angles. This will free lint stuck to the sides. Then, insert shop vac hose after each section to clean up the duct and minimize dust where' you're working. As noted in other reviews, DO NOT REVERSE the drill, or it will disengage the sections inside the duct, and that's gonna be a pain. Finally, several reviews have mentioned using two pair of pliers to hold the sections when unscrewing them. The better solution is to use vice grips to lock on the section you want to unscrew. Easy. I think this product is decent quality for the job, and it will last a long time if you use it correctly. I would recommend this product for budget-conscious folks, but you need a drill and a decent vac/shop vac to collect the mess that comes out.
D**R
Gets the job done but expect a bit of a learning curve
I'm giving this 5 stars because it did what it advertised and held up to a lot of unnecessary abuse as I figured out how to use it. And it prevented me from having to spend $100s to have someone clean a 25-foot duct for me. And I didn't even know this tool existed before I needed it. Thanks, Uncle Capitalism! That said, I found it took a while for me to get the hang of it and it was more of an adventure than I bargained for. I needed to clean about 25 feet of rigid dryer duct that ran between joists to the exterior of the home. I suspected the duct was partially or completely blocked when the thermal fuse on our dryer element blew. I was happy to find this product which offered a DIY option. I was able to unblock the duct and remove an astounding amount of material in the process. The product does work as advertised. The plastic links are both durable and flexible, a property that I tested well with my inexpert operation. Here are a few tips in case you decide to try it yourself: - It's very flexible and strong. I was able to get it through a duct that had two 90-degree bends, although they were at opposite ends of the straight run. - It's much easier to get the brush to move forward when it's turning. It has a slight corkscrew effect. If it's clogged with lint you can also pull it out while it's turning. DON'T SET IT TO REVERSE. More on that in a minute. - You don't have to spin it very fast to get it to work. Slow and steady is best. - Clear a little at a time. Similar to how you pull back a drill bit to clear the material clogging the bit, when you pull the brush out, it will bring the cleared lint out with it. If you try to shove it through you might end up compressing the blockage and making it harder to clear. - DON'T TURN THE BRUSH WITH THE DRILL IN REVERSE. I read the directions to this effect and thought, "Bah, what idiot would do that?" Within seconds I had lost the brush deep inside the duct. With dogged persistence and a steel fish tape bent into a hook I managed to retrieve it but it was not fun. Why did I do this? Because I would hold the handle section closest to the drill with pliers and reverse the drill to back the "bit" out of the threads so I could attach another section. As long as I set the drill to the forward setting before attempting to turn the brush, this worked fine. But when I forgot...hours of my life disappeared. - Don't have a long section of the rod sticking out when you try to turn it. It's the duct that gives the rod enough rigidity to spin without twisting into a pretzel. When you try to turn it with the rod sticking out of the duct, it will tend to twist up, and then you have to untwist it, which is a pain. Eventually, this could cause it to break and get stuck in the vent, although mine held up well enough. I was surprised at how durable it was. Plastics! - Go slow and add one section at a time. Now that I have the tool I am going to clean this duct at least every six months or so (it had been ten years) so I don't blow up my dryer or burn my house down. It's a cheap investment in that sense. Overall, a clever tool that works as advertised, but it requires a little finesse and overcoming a bit of a learning curve and not doing the dumb thing the directions tell you not to do.
S**N
Great Option to Clean Vents Yourself
Use: I have a dryer vent that goes up through the roof. The house is about 8 years old...I bought it about 3 years ago and never have cleaned the vent pipe. After cleaning it out, I'm not sure if anyone ever did. I was debating doing the cleaning myself or paying a service to come out to do it for me. I found this brush kit and decided to try it out myself. I got the 40ft set. Pros: - Did the job well: As shown in the pictures, it did great about loosening up lint and other stuff stuck in the vent pipe. It also cleaned the flexible dryer hose as well. -Ease of Use: I also have a couple ease of use cons as well. This is pretty straight forward on how to use. If you are doing this by yourself, only attach 1 to 3 sections at a time, and you will need to remove around that many as you come back out of the wall. It will make it so much easier, just extend your time a little more. Also, do not use the little drill adaptor end if you are using a drill. You can attach your drill directly to the collar of the extension piece. This will save a lot of time and will not damage the end. Cons: - Ease of Use (pt 1): When using it by yourself, you will want to only put on 2 to 3 max extensions at a time. I tried to put on more than 3 at one time and would struggle to keep it from getting tangled up on itself. Because of this, it took longer to run up and bring back down. I would have to remove 2 to 3 sections at a time when bringing it back down. - Ease of Use (pt 2): When trying to unscrew sections, I had to have a couple sets of pliers. While this is good at ensuring it will not come apart while in the vent, it was challenging when trying to break it apart while also bringing it back down. - Quality: The quality is pretty good, but I have one complaint. At one point when it got tangled around itself, one of the extension pieces ended up bending near the end. It will not straighten back out, so I pretty much am down 1 extension piece. Not a big deal since I ordered the set that was way over the length I needed, but just a note to remember. Summary: I found this set did exactly what I wanted it to do. When I figured out, when doing this alone, you only want to attach a few sections at a time vs making a long snake. The long snake just twisted around itself especially it if was trying to bind up. I also found it does not do too well if there are curves in the pipe. I am not sure if it was getting caught on junctions or if there was a curve in the pipe somewhere in my wall, but there were parts where I thought it had gotten stuck. I was able to get it unstuck, but it took some force. Overall, though, I really like how well this worked. As you can see in the pictures, I had a lot of lint stuck in my pipe. On a side note, I made an attachment to connect an air blower from my compressor to fit around my vent pipe to blow loose lint from the pipe. Probably why there was more on the roof than in the laundry room.
T**Z
does what its intended for
M**A
I have been using this to go through my dryer vent to clean it up and its has been a pretty easy job using this brush. 40 feet of flexible cable was enough to go through, i even seen the brush outside and that big pile of lint on the floor. The brush is pretty strong, so it will brush well. It is also the size of my vent and probably the same as yours since i have a pretty standard vent. The cables are attached by screwing them to one another, so you can use as much as you need. Recommended !
P**E
Did the job it is supposed to. One of the pieces twisted going around a corner and had to be discarded, another piece the threads were no good and also has to be discarded. The rest worked as the are supposed to.
A**R
This dryer duct cleaner worked great when I attached the pieces to the drill and used it to clean the lint from the duct attached to the dryer. When I tried to clean the duct from outside the house, the brush with 5 or 6 attachments, started spinning out of control. I think I shouldn’t have started with the 5 or 6. Maybe gradually adding one piece at a time, which is what I’ll do next time. I also bought the 40’ Holikme, which was way too much. I learned a lot from this experience, but the product is great. I got a lot of lint out of the dryer duct. I would definitely recommend this. Just make sure, you buy the right size.
C**O
Works great! Just screw em together as you go and pull out the crap. I used this in a twisted modern home that some moron home builder constructed. Over 25' feet in and had multiple twists for no reason. Tool worked though, got around ALL of the pointless turns. Can you tell I'm pissed off? Great product! Thanks for making it.
Trustpilot
1 month ago
4 days ago