

🔥 Transform Your Space with Smart Comfort!
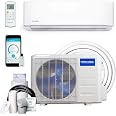
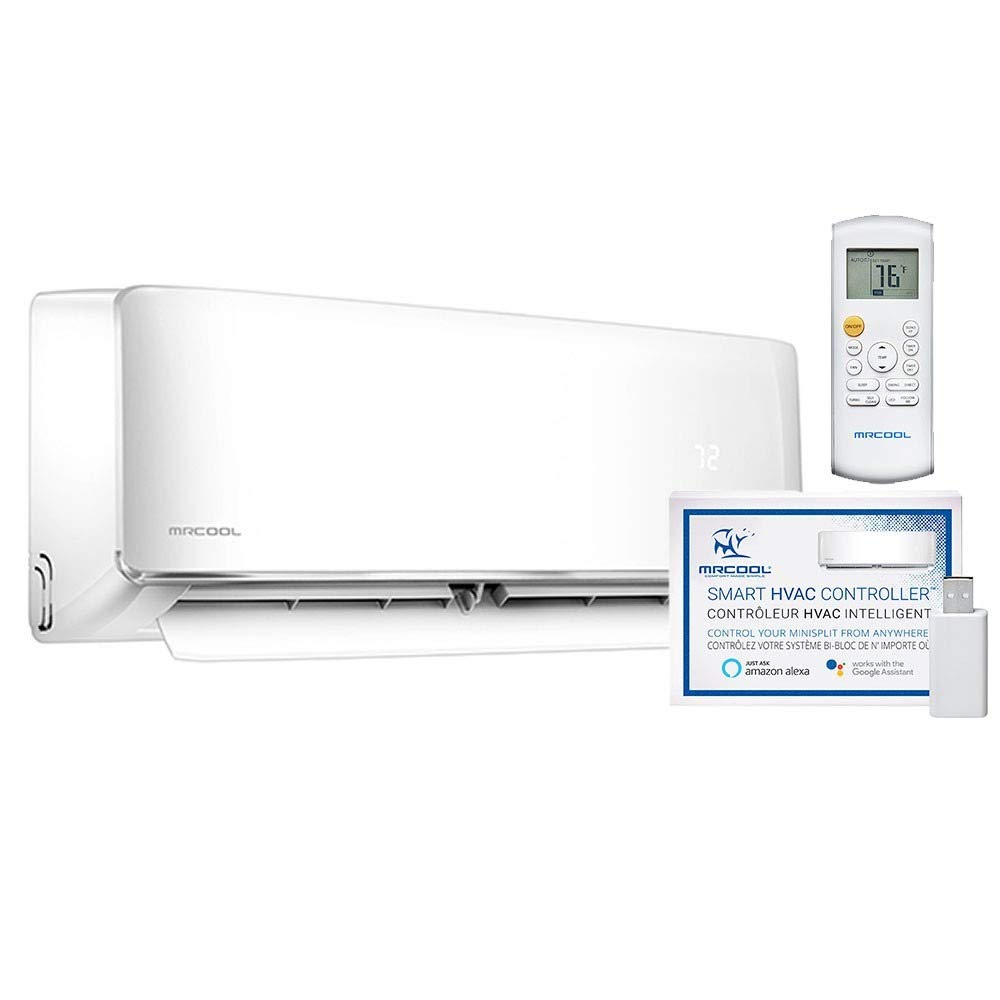
The MRCOOL DIY-36-HP-230B25 is a cutting-edge ductless heat pump split system that delivers 36,000 BTUs of heating and cooling power. With a 16 SEER energy efficiency rating, easy DIY installation, and smart home compatibility, it’s designed to efficiently manage the climate of a 1500 sq ft room while keeping your energy costs low.
| Manufacturer | Mr Cool |
| Part Number | DIY-36-HP-230B25 |
| Item Weight | 285 pounds |
| Product Dimensions | 16 x 30 x 22 inches |
| Item model number | DIY-36-HP-230B |
| Size | 36,000 BTUs |
| Color | White |
| Style | Smart 36K BTUs |
| Pattern | Split System |
| Thickness | 11 Inches |
| Power Source | Corded Electric |
| Voltage | 230 Volts |
| Wattage | 10556 watts |
| Installation Method | Split System |
| Item Package Quantity | 1 |
| Special Features | Google Assistant,Wifi |
| Included Components | Condenser, Air Handler |
| Batteries Included? | Yes |
| Batteries Required? | Yes |
| Battery Cell Type | Alkaline |
| Warranty Description | 7-year compressor warranty and 5-year parts warranty |
| Capacity | 3 Tons |
| Floor Area | 1500 Square Feet |
C**F
Easy to install assuming everything else is in place and works great!
We have an older house that didn't have HVAC in my office which is 15x27, but also not well insulated. We had been using a window A/C unit for the summer which worked OK, but in the winter I was running 3 heaters to try to keep it above 60 degrees. We had a mini-split professionally installed in another part of our house and it was amazing, but I didn't want to spend $5k-$7k on another one and heard good things about these units.Shipping was quick but did require a specialized delivery that was easy. It came in two boxes - the compressor for outside, and the head unit for inside. The concept is simple - drill a hole from where your inside unit mounts to the outside, run the connection lines through the hole to the compressor, and connect everything up with the precharged lines. I would highly recommend going to YouTube and watching some of the videos people have going into a little more depth about the process, but it really is about as simple as that.A couple of things worth pointing out.1) Most of the videos skip over the need to already have 220v electrical running to the unit. I installed a new 20A breaker and ran 12/2 wiring from the breaker through conduits to a non-fused A/C cutoff switch, and then ran a 12/2 whip from the cutoff to the unit. For most people I'd highly recommend just having an electrician run those for you so it's ready to go2) You have to drill a hole from inside to outside. It needs to be around 3.5" in diameter. That's fine if you have a wood frame siding. Ours is brick. I don't care what the videos say, if you have a brick house go rent a core driller. I used a 4" x 17" core driller I rented for $200 from Home Depot and it took me about an hour to cut the hole (keeping it watered and going slowly to avoid burning out the bit or the drill). It made a night and day difference.3) You'll either need a ground pad or mounting brackets for the compressor. I picked up a ground pad from a local HVAC supply warehouse for around $40 and mounted the compressor to it.4) Make sure you are reading the right manual. They sent both the multi-zone and single-zone manuals with our unit. There's not a lot of difference, but if this is your first time doing this, the single-zone is going to keep you focused on the right things5) Finally - *read the manual thoroughly before starting*. You only get one shot with the precharged lines, so make sure you understand the process and the routing. It's not difficult, but you don't want to get it wrong. I used a spray bottle with dish soap and water as my leak checkerOnly other thing worth pointing out - DIY doesn't mean not needing permits or inspections. You'll want to potentially check your local jurisdiction to find out if you need permits for any of this.All in all super happy - it's quiet, keeps the office a perfect temperature and was easy to install. Would definitely recommend!
J**D
Excellent cooling
I bought this unit to heat/cool my 4 car garage (approx 950 sq ft). I converted a section of the garage to my workout and office space. The pre-charged lines worked perfectly and saved me the hassle of buying extra tools. The rest of the installation was straight forward - lots of videos online with good information.The good - the cooling is excellent! With outside temperature of 100 the garage will get as hot as 95. The Mr Cool unit can drop the temperature in my office space to 85 in 5 minutes and under 80 in less than 15 minutes. The rest of the garage takes a bit longer to cool but eventually the entire space feels nice. I keep the setting at around 79 which honestly feels like 72 to me.The not so good - the heating is ok. With outside temperature of 50 and garage at 65 it heats up to the 70's no problem. 40 degrees out it's ok. 30 degrees is where it struggles a bit. It can heat my office space up to 68 but I wouldn't call it "warm". My walls and ceiling are insulated but I don't have insulated garage doors. I might insulate the doors before winter to see if I get improvement. It is impressive in that it can still provide heat even when it's 5 degrees outside, however, I do not run it below 20 primarily because it's not super effective at that level and I don't want to risk damaging the unit.I'm giving this a rating of a 5 because the installation was relatively easy, noise level is low, provides excellent cooling and I like the wireless connectivity app on my phone. Heating is good but not great. Overall a good value.
G**.
DIY install
Purchased this unit for a single wide mobile home install. I've been cooling with a 18k window unit in the kitchen. It was very loud but did a good job. It was located in the very front corner window and was the only source of cooling. This was a true one man DIY install. Unit arrived in great shape and was undamaged with all parts included. I watched every youtube vid I could find before starting this project and some more than once. I went step by step including pouring a concrete pad a few days ago in 100 degree weather. So here we go. Mounted the air handler plate and drilled the 3.5 inch hole. BTW, this is a 3rd Gen unit. I had notice some say that the hole saw and cresent wrenches were included which was hard to believe. That was not the case for me. My greatest fear through the whole project was kinking the lines. Anything else I could recover from but that would have been game over. I got the air handler mounted and lines through the hole. Now to the outside. I didn't buy the lineguard at first but the more I read it seemed like it was a "must Have". What held me back was the price. IMHO a little steep but I bit the bullet and got one before I started. I kept a "healthy fear" while attaching the lines and making the connections. I knew I had one shot at it. Everything hooked up as it should while taking my time. I'm glad I got the line guard. Makes the install look must more pleasing to the eye. So now I'm down to the electrical. I had a 220 running from the fuse box in the rear of the mobile home all the way to the front for the window AC. It was added I would say in the late 1970s. So I shut off the breaker and unhooked it from the front and pulled it back to my newly installed power shut off. I got the one that you can just pull the handle to disconnect. While installing I felt like it was a cheaply made box. So I get everything hooked up and turn the breaker on. I got nothing. Unit does not power up. I felt it was most likely an issue with the cheap GE cut off box. So I bypassed it to see if I could get power. It fired right up as it should. I think I heard Angels sing. So I went and got a better cut off box and wire everything back up and it fired up as it should. The only reason I knew at first was the degree light came on. I CANNOT believe how quite this thing is. You really can't hear anything from the air handler. And outside the compressor is just as quite. Very impressed. Things I've learned I didn't know or expect. Once the set temp is reached the air handler fan does not turn off. The compressor outside does but the handler stays on. From what I read this is normal. I'm using the included remote and the phone app. I can't put my finger on it yet but it seems like they don't update each other. I know the app is dated but it does work and I got it working with Alexa as well. Overall and right now I give it 5 stars. It does everything I hoped it would and once again the lack of noise is incredible. It it holds up it was well worth the investment.
Trustpilot
2 months ago
1 week ago