


🏡 Elevate your kitchen game with classic farmhouse flair!
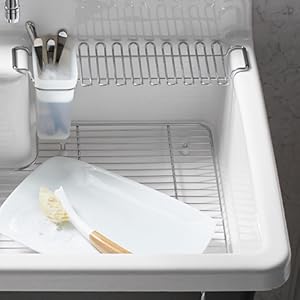
The KOHLER Whitehaven 36-inch single bowl cast iron sink features a durable enameled finish, a self-trimming ridged apron front for easy installation, and an offset drain for maximum workspace. Designed to fit a minimum 36-inch apron sink base cabinet, this white rectangular undermount sink combines timeless style with lasting performance, backed by a lifetime limited warranty.


| Brand | Kohler |
| Color | White |
| Material | Cast Iron |
| Size | 36 Inch |
| Product Dimensions | 25.38"D x 40.75"W x 12.38"H |
| Style | Single Bowl with Ridged Apron |
| Installation Type | Undermount |
| Finish Type | Brushed |
| Shape | Rectangular |
| Drain Type | Offset drain |
| Item Weight | 140 Pounds |
| Base Width | 24 Inches |
| Product Care Instructions | Wipe with Dry Cloth |
| UPC | 885612288530 |
| Global Trade Identification Number | 00885612288530 |
| Manufacturer | KOHLER |
| Part Number | 6351-0 |
| Item Weight | 140 pounds |
| Country of Origin | Canada |
| Item model number | K-6351-0 |
| Is Discontinued By Manufacturer | No |
| Finish | Brushed |
| Pattern | Ridged Apron |
| Item Package Quantity | 1 |
| Number Of Pieces | 1 |
| Batteries Included? | No |
| Batteries Required? | No |
| Warranty Description | Lifetime limited warranty |
R**L
Some installation details to consider. Very satisfied with product.
Update: I've had this for two years now. Still as good as new. No chips. Cleans easily with Bar Keeper's Friend. Much better than a sink with a divider.Need Plumbing Supplies was great--arrived by freight delivery. Installed without a problem into an existing 36" cabinet and no alterations to the doors. Just needed to remove the upper faux drawers and disassemble the surrounding frame (Note that we did not need to cut the cabinet, as the frame surrounding the "drawers" can be unscrewed. FYI, I was unable to find any other manufacturer who sells a short apron farmhouse sink, so it seems this may be your only option if you don't want to modify your cabinet doors.I did notice that while cleaning a pan that rubbing it against the walls did leave scuff marks that I buffed out. It is certainly a good idea to buy the Kohler racks for the floor of this sink to prevent damage, despite the lifetime warranty. As an undermount sink, you would have to pull up the counter tops just to remove this, so I'm not compelled to test Kohler on their warranty if I can avoid it.The counter person drilled the faucet hole about 1/4" off center of the Kohler logo on the back wall of the sink, but centered on the counter opening. It is something to think about when you are approving where to drill your faucet hole. They also drilled too close to the sink edge, but drilled instead to standard distance, so I imagine the lip on the sink is larger than typical. Had to install a shank extender to mount to faucet since the faucet nut could not be screwed to the underside of the countertop since the sink was in the way. Thank goodness the third person I spoke with at HD knew what to recommend to solve the problem, as I was scrambling on a late Saturday afternoon for a solution, and all the plumbing specialty supply stores were closed. What was most helpful was taking photos of the installation and layout under the cabinet, as it was difficult to convey exactly what the problem was to various people otherwise.A shank extender is basically a plastic cylinder which is narrow enough to fit between the hole and the sink edge. I had to use a tool to slice it lengthwise to open it slightly and fit around the faucet threads, but it provided the needed extension to give the nut a stable flat edge to secure, in my case, a very large and tall faucet.If you do the plumbing yourself, be sure to plan on getting plumbers putty for the flange which you'll need to buy. I like the Kohler flange since the Kohler lettering is subtle and not overbearing like the In Sink Erator flanges. You can find a couple of really good youtube videos which will show you how to use plumbers putty. The hardest part about installation was getting the garbage disposal remounted, and I used a dremel tool to smooth out the mounting ring, which was a little rusty and made it impossible to mount otherwise. It is very difficult to mount the disposal without the tool that presumably comes with a new disposal. Alternatively, consider buying a new set of mounting bracket rings, or even a new disposal. In retrospect, I would suggest hiring a plumber to reconnect everything after the countertop people do their thing. While I learned a lot about the plumbing, I this was a very time consuming and stressful task that a skilled plumber probably would have been equipped to deal with. Because the sink hole was to the right of the hole in the sink it replaced, I needed to buy and cut pipes from HD, as that flexible plumbing drain kit I bought here did not work well for height reasons.Also, since there are different suppliers here, you will want to ensure you buy from an authorized Kohler reseller if you want that mfr warranty. The Kohler website does not have a page listing authorized online resellers, but Need Plumbing, build.com, and maybe some others (can't remember which) were confirmed to be authorized by a Kohler customer service rep. Unless they create a listing on their website, I'd suggest calling their 800 number to verify whatever reseller you would like to use.The sink is not really more than an inch wider than the sink it replaced, but the white color, the lack of divider, and the greater front to back length really makes this seem much larger. Paired this with a large Ruvati faucet and it looks quite impressive together.
S**A
Perfect Fit, Great Look, Vague Instructions
I am so glad that I gave in to my wife's wishes to install an apron front sink, and even more glad that I chose this one.This fits perfectly in a standard base cabinet. The width measurements match perfectly: if you have a 36 inch base cabinet you want the 36 inch sink; 33 inch base calls for 33 inch sink; and 30 to 30. This is important, because you will get conflicting information on this from both reviews and some more general installation videos out there.I was VERY timid about cutting out the face of the cabinet, and, frankly, my first cut looked like it had been done by a 3-year-old. Happily, I discovered that the lip of the apron front extends precisely to the sides the cabinet, thus covering my amateurish work. And it completely covers where the holes for the false drawers were.The short apron is made for standard, contemporary base cabinets--such as ours, with double false drawers on the front. Double-check the height from the top of the cabinet to the top of the cabinet doors to be sure that there is room for them to swing open under the apron.Installation calls for some modification of your cabinet. I'll spare details here, but there is an excellent 4 minute video right here. It makes the whole thing much more intuitive so that you understand the necessity of each step:https://www.youtube.com/watch?v=HP7vOx1ZCHE(Or you'll find it by Googling 'Kohler Apron Front Sink Installation.")[LATER EDIT: The video does not mention taping the template to the front and tracing it out (I had forgotten about that). And, frankly, though I did trace the template and cut out the rest of the front, there was very little left to cut. I wondered whether it was really necessary. I'll leave you to be the judge.]The accompanying instructions say nothing about the thickness of the board used for the internal support frame. The video indicates that they must be no thicker than 1 1/4". (Too thick and the sink would not slide in.) The depth of the installed sink--i.e., below the countertop-- is important. Both the accompanying instructions and the video indicated that the horizontal support boards should be 5/8" below the top of the base cabinet. The claim in both sets of instructions is that with the support frame attached at 5/8" below the top of the cabinet, and given the thickness of the flange on the sink, this will leave about 1/16" gap between the top of the sink and the bottom of the countertop. I was METICULOUS in my measurement, making sure that I struck a level line exactly 5/8" down from the cabinet top. But once I installed the sink and then checked its depth below the cabinet, it was significantly more than this. I ended up shimming the sink up a bit to get it closer to the 1/16" down.I hope all of the above paragraph makes sense. The intuitive idea: The countertop goes ON TOP of the sink edges, so the sink has to be down just a bit but not too much--just enough to apply a bead of caulk as a sealer. I found that resting the sink on a frame 5/8" down was just a little TOO far down. No big deal, though, if you find that you need to shim up.I am attaching a few photos that show my (amateur) progress as I worked on the installation.This is a great sink at a great price. Super happy with it.Now if the guys with the granite countertop installation will just show up!
J**R
Beautiful!
Gorgeous and will last forever. This was a great price and no having to mess around with a plumbing distributor.
B**N
Beautiful Addition
We picked this sink during a makeover due to the self-trimming feature and it is perfect! We did no cutting on the cabinets and fit perfectly above the bottom doors. I fit will say if you are installing granite with a Moen industrial type faucet, do not use the template that comes with the sink. Or at the very least make sure you get cutout dimensions correct. Our granite installers did not want the spec sheet for the faucet, soap dispenser or glasswasher only the Kolher cutout. The faucet and soap dispenser distance over the sink turned out fine. The soap dispenser could have been a little further over the sink. The glasswasher is not even close! Our work around was to install a sheet of silicone under the lip. The sink is very sturdy and heavy. It sits a little lower or deeper in the cabinet. This is not a problem at all. I get asked if I have to bend over more to do the dishes and no, I do not. I have not put any "sink protectors" in the bottom and so far no problems with pans scaring. The only issue if you can call it that is splashing water and the smaller side of the sink. The splashing may be due to the new industrial faucet. The smaller side, I am not used to. I had a Moen double bowl sink previously and I used the right side for garbage disposal use. I have the garbage disposal on this small side now and it is smaller, making it challenging. Neither one of these are a show stopper and very please with this sink. Would buy it again.
Trustpilot
5 days ago
2 weeks ago


