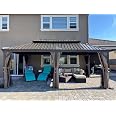
🌟 Elevate your outdoor lifestyle with Domi’s ultimate all-weather gazebo!
The Domi 14' x 20' Hardtop Gazebo combines a robust galvanized steel double roof with a ventilated design and durable aluminum frame, offering a spacious, weather-resistant outdoor retreat. Featuring built-in rainwater drainage, UV protection, and removable curtains with insect netting, it’s engineered for comfort, privacy, and longevity—perfect for upscale patios, decks, and gardens hosting 20+ guests.


| Item Weight | 506.4 Pounds |
| Item Dimensions L x W x H | 233.76"L x 165.6"W x 126.36"H |
| Item Shape | Rectangular |
| Color | Brown |
| Style | Metal Hardtop |
| Frame Material | Metal, Aluminum, Alloy Steel |
| Material Type | Aluminum, Alloy Steel, Metal |
| Required Assembly | Yes |
| Ultraviolet Light Protection | Yes |
| Occupancy | more than 20 |
| Water Resistance Level | Waterproof |
A**R
Great product, tough to build solo
I'm generally not one to leave product reviews but I felt like I should share my experience with others since this was a very large investment.The product itself:This gazebo looks great! The beams look very much like wood and it is beautiful. It is surprisingly good quality. Very sturdy and heavy. I figured buying something like this on Amazon it'd be decent but not this good. After getting everything all put together, I can barely shift the structure while using significant force. The only questionable piece of this gazebo are the screen holders. They're made of plastic, and they may or may not last several seasons. We'll see, but they should be easily replaceable.The instructions:I saw some reviews complaining about the instructions, but honestly they were fine. There are many pictures that you'll just need to reference over and over again as you construct piece by piece. There were several times I made an assumption about the instructions, was wrong, and had to remove some pieces. Just pay attention to what you're doing.The packaging/delivery:Aluminum isn't the hardest, stiffest material so it's understandable that somethings will be bent or dented. With that said, the majority of the pieces were in pristine condition. There were a few dents in the roof frame, but nothing that is really noticeable or unfixable. There was one issue with the rails for the curtains as one of the edges was bent and prevented the holders from entering the track. Easy fix of bending it into position. One negative, the packaging for the screws/bolts is EXTREMELY flimsy. It came apart in the box and as a result some of the screws are missing. I will need to reach out to customer support to get replacements.Installation:Let me start off with a description of myself. I'm a fairly average sized man, with I'd say average strength, and has had a decent amount of experience building prefabbed things like furniture. I am by no means very strong, or in construction. With that said, I was able to build this gazebo mostly by myself, but it took a long time, roughly 20 hrs over 2 days for the structure itself. It was next to impossible to get the roof frame on as one person so you will need some help. If you're attempting to take this on by yourself you will need: 2 ladders 1 at least 10 feet, a power drill with hex bits, and the ability to hold ~30+ lbs in the air with one hand. You'll need to use both the ladders for balancing the beams, as well as going up and down constantly at different heights for assembling the roof.Mounting:Regardless of where you live you need to anchor this gazebo to something. We opted for the planter route instead of anchoring directly into our patio. The gazebo itself is anchored into 4 patio pavers, then planters are on top of the pavers, and in each planter there's at least 100lbs of gravel, sand and dirt. If you don't anchor this thing a storm will come and take it away even though it weighs over 400lbs.Other caveats:1 downside i noticed while assembling everything, there are no caps to the tops of the posts so things will get in there. There are also several other crevasses that will lend themselves well to pests. My worry is that for the posts water will well up in there and be a breeding ground to mosquitoes. I will need to put deterrents and mosquito pesticides directly in the posts regularly.
A**M
Very nice looking and sturdy once assembled.
I had a gazebo with a metal frame and a cloth top but I kept having to replace the cloth top after several storms. I decided to upgrade to this gazebo based on the reviews and I'm super pleased with my purchase.It's been a year in the weather and everything still looks nice and new -- no rust, no leaks, very sturdy even in high winds. Definitely a nice shady retreat / protection from the sun in hot Southern summers.It takes a hot minute to put it together just because of the sheer number of parts alone. It will definitely go faster with more people, but it's doable alone if you have to go it alone. I was able to do everything by myself (and I'm a 55 year old female) except for attaching the M/N/K assembly to the four footer posts. I probably would have figured out how to do it alone eventually, but I had help at the time so I took it.There were a couple of pieces that had slight bends in them. I made the decision not to ask for replacement parts and it worked out fine. By the end, everything was squared out and bent back to shape. All the holes lined up fine/nothing was mis drilled.The only con to it for me is there is no separate rail or holes that I can use to hang up planters or bird feeders. I hung some planters off the upper outside (as shown in the pic) this year but they don't feel secure so I'll probably take them down.TIPS:>> Get a battery operated driver that you can change out heads on. I spent $17 on mine and it was worth it.>> If you are anchoring to the ground or concrete, you can save that toward the end. (If doing it in planters, set the legs in there, but don't fill to concrete until the end.) I found that I needed to move/realign the legs at a few different points until it was all together and square. Couldn't have done that if it was already anchored.>> Definitely use double-sided tape on the Z, Z1, Z2, Z3, Z4 and some of the S bumpers>> For some reason, the instructions have you putting in T1 and T2 on before you slide the V panels in. Insanity. It went much faster for me to slide in the V panels and then line up and attach the Ts after. They even have videos online of other versions of their gazebo doing this so I'm not sure why this particular one they had it in reverse.>> When sliding the X panels, try both under and over. I kept trying to slide over on X3 and X6...struggling for a long time until I slid under and it went in like a breeze.>> When it's time to screw in the #6s near the top of the gazebo, you can undo the mesh mosquito/bug panels on the inside and reach the screws easily from the inside instead of trying to pretzel yourself across the top of the gazebo on the outside.>> When it's time to screw in the 5s...using a screw driver inserted into a higher or lower hole to line up the panels and keep them in place acts as a spare hand.>> When it's time to screw in the 7s... use double-sided tape to attach the S bumpers from the inside. For an extra set of "hands", I duct taped a small wrench on the inside to hold the nut in place and then could screw the bolts in from the outside, atop the ladder.I totally would buy it again. If I were rich, I'd pay someone to put it together.
Trustpilot
2 days ago
1 day ago