


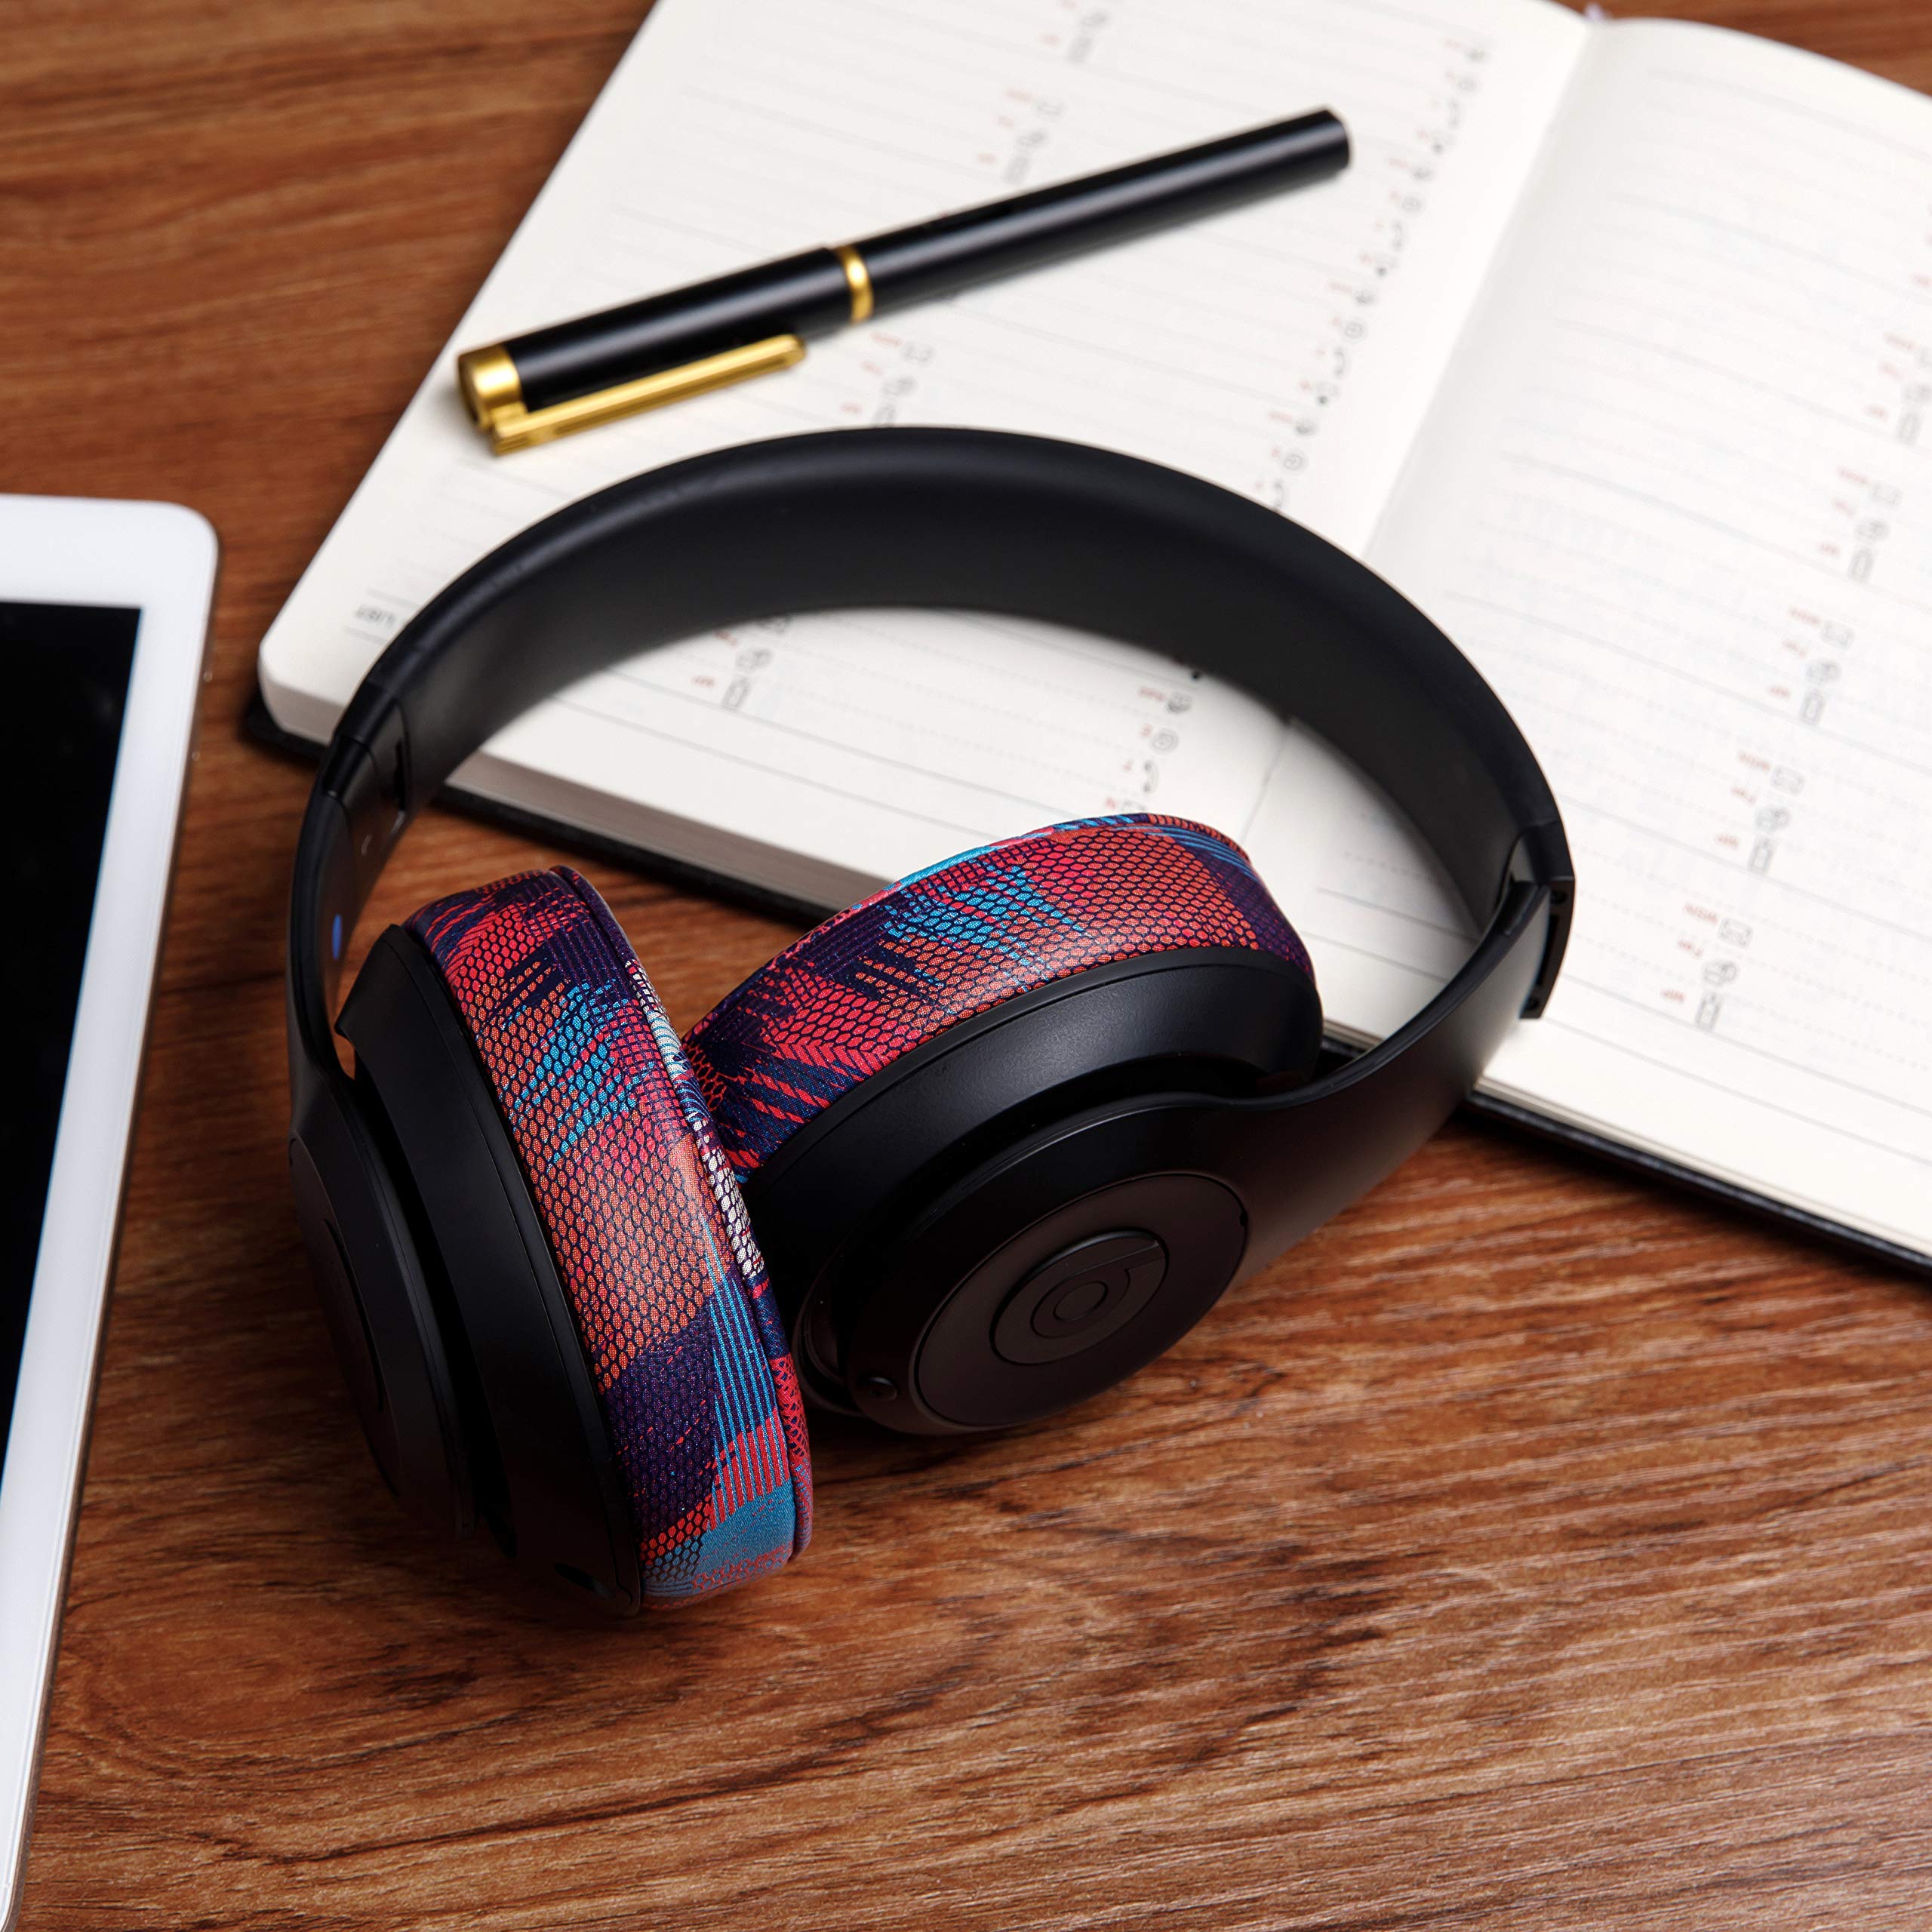


🎉 Elevate Your Beats Experience!
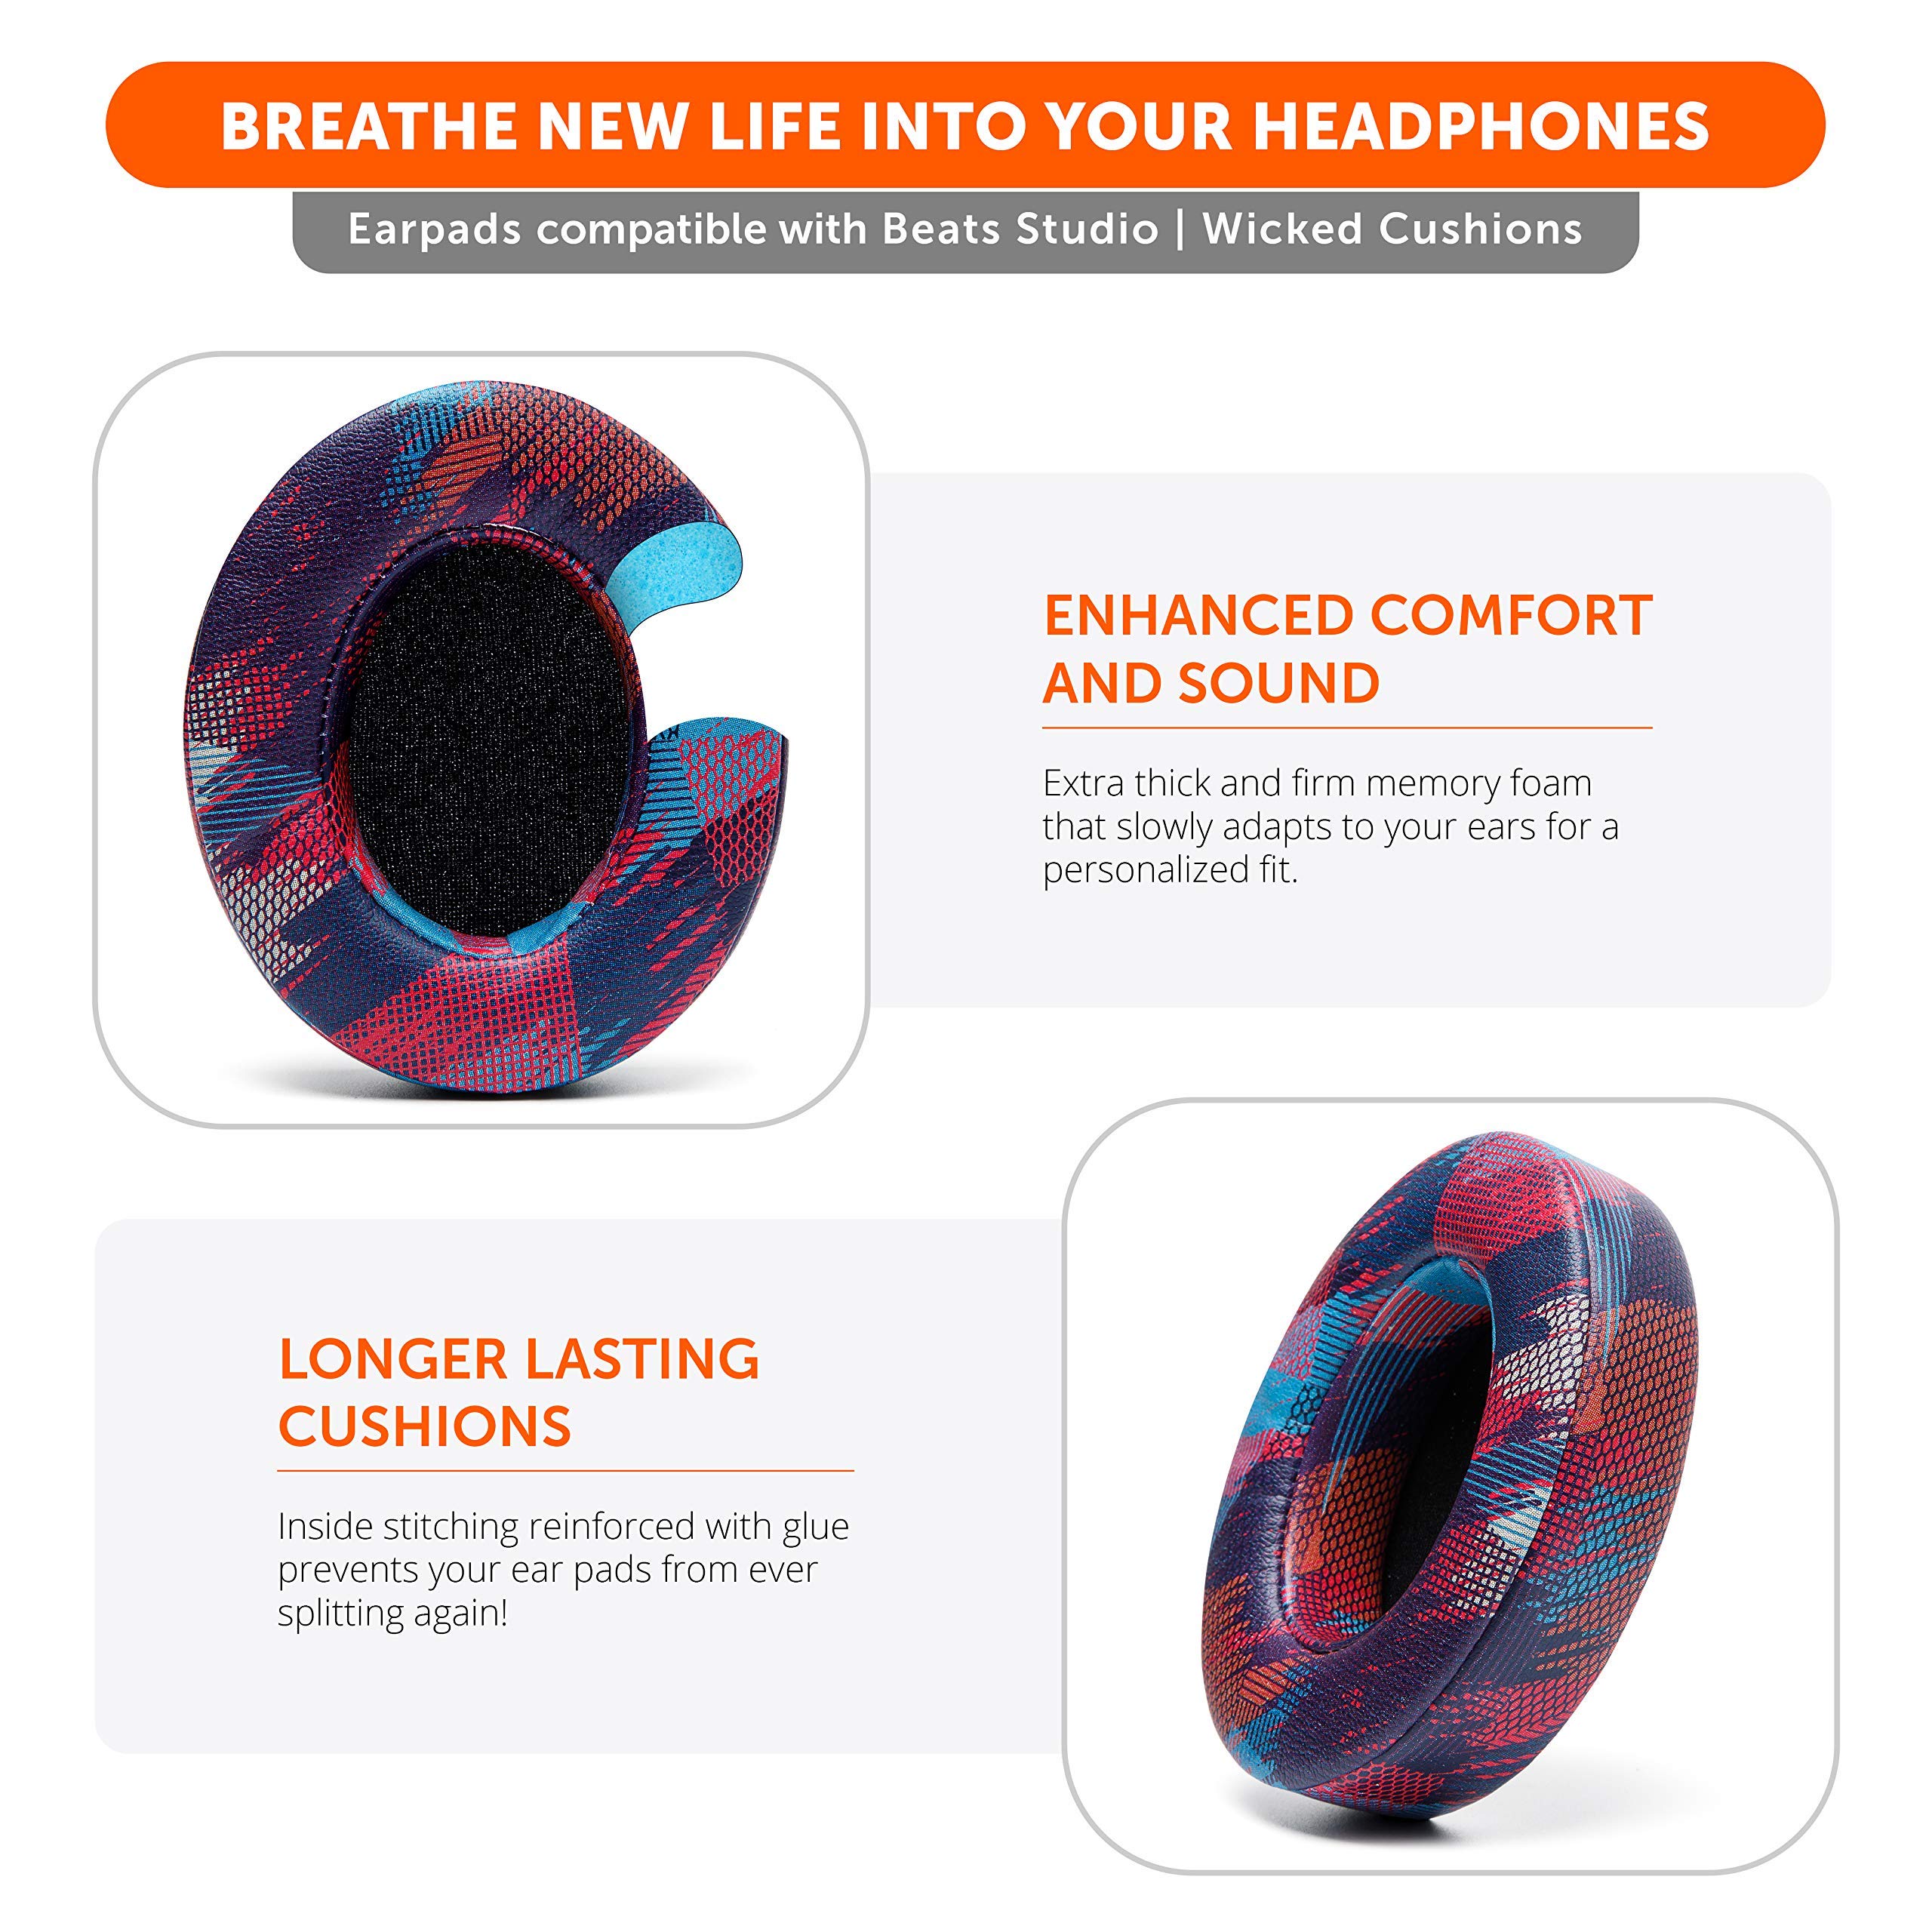
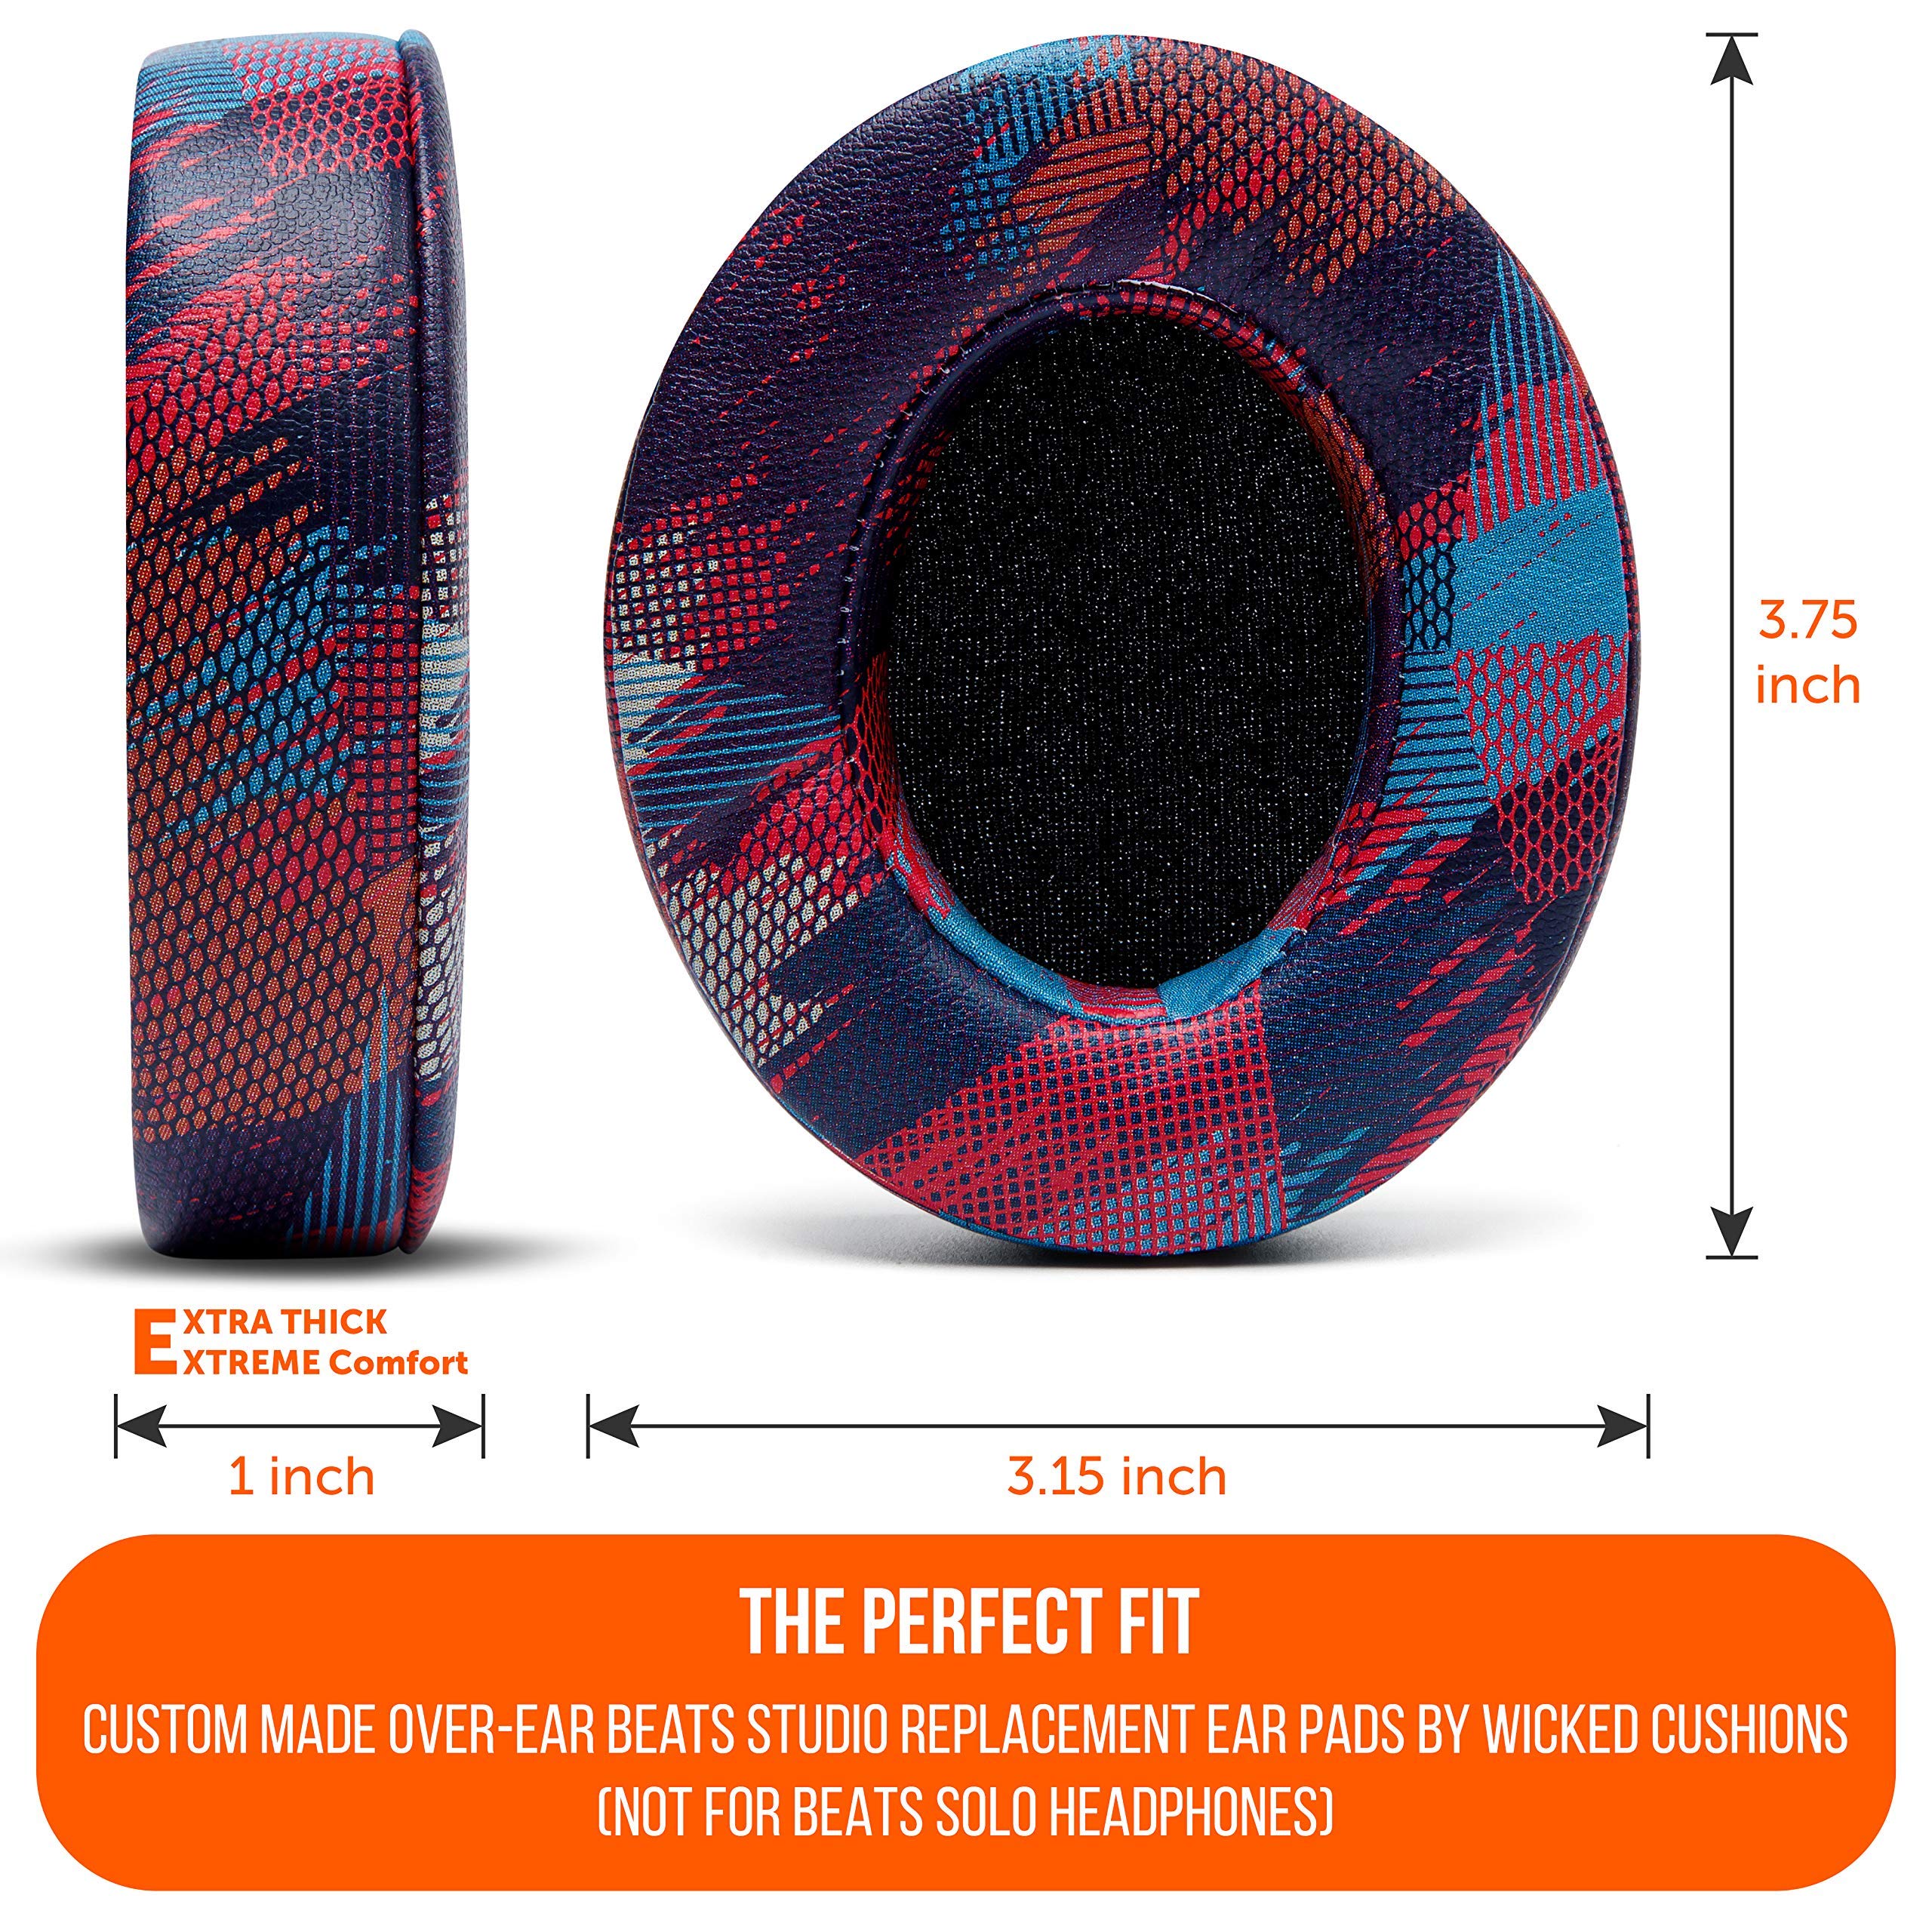
WC Wicked Cushions Replacement Ear Pads are designed specifically for Beats Studio 2 & 3 headphones, offering a perfect fit, enhanced sound quality, and exceptional comfort. Made from durable materials with easy installation, these ear pads are the ultimate upgrade for your audio experience.
| Manufacturer | WC, 818-481-4092 |
| UPC | 850935008806 |
| Product Dimensions | 17.09 x 11.71 x 2.69 cm; 32 g |
| Item part number | WC-STUDIO-PARENT |
| Mounting Hardware | Earpads and Instruction Manual |
| Number of items | 2 |
| Headphones form factor | Over Ear |
| Batteries Included | No |
| Batteries Required | No |
| Cable feature | Without Cable |
| Connector Type | Wireless, Wired |
| Does it contain liquid? | No |
| Includes Rechargeable Battery | No |
| Manufacturer | WC |
| Country of Origin | China |
| Item Weight | 32 g |
A**T
Love it.! Saved my headphones.!
Firstly the quality of the product was exceptional. Sure, you pay a bit of premium but the quality is totally worth it. I like these better than the original in terms of comfort. Now in terms of design, I couldn’t have hoped for a better design the the camo I opted for, but again, design choice is more or less personal. Go for it without an my hesitation. They won’t disappoint you one bit. Everything from the quality to installation was top notch.
N**S
Good
Good replacement for the original..
S**Y
The Quality Justify Its Price tag!
I am Very Pleased To Have Ordered This Product.Purely Made In China,But The Quality Is Great.I Have Beats Wireless Studio And This Product fits The Best.The Ear Cushions Are Very Soft And Fits Prefectly On My Beats.Simple DIY For Self Installation.After A Very Long Time,My Beats Are Back To Life.
K**
Excellent cushions!
The ear cushions are a perfect fit for the headphones. They adhere exceptionally well. The quality of the cushions is really good.
D**L
Quality is Good but not soft as original
Quality look good, but softness is little less than original and also price is very high.
J**.
Great quality - like originals
It was easy to install and perfectly fits my Beats Studio3. Looks ordinal and great quality. Highly recommend it
P**H
Best
The most common type
D**U
Great
Great product
S**Y
Great product
Great product. Timely delivery. Excellent replacement. Easy to follow instructions on assembly.
C**O
Da qualidade.
Produto satisfatório.
C**N
si quedan bien como las originales
no es fácil instalarlas se requiere de conocimiento pero quedan muy bien después de su correcta instalación sus materiales hasta ahora se ven bien después de varios meses de uso lo que noto es que una ya se esta manchando de blanco una pero siguen sin pelarse como las originales son suaves y iguales que las originales no notas la diferencia si las recomiendo
I**S
Gave My Beats 2 Studio Headphones New Lease Of Life. Comfortable And Work As Well As OEM Earpads
1. The old earpads of my Beats 2 Studio Wireless headphones, model B0501, had become flaky beyond the point of no return and replacement earpads were needed as the headphones still worked perfectly.2. Watch the videos on YouTube on how to replace earpads so that you can have an idea and build confidence and see the process from beginning to end. The Wicked Cushions video is the best but there are other videos by Martin's Tech Blog, Brian MacDuff and another one by Wicked Cushions with the Stewie Griffin voice. (but that's an older video where the 3M adhesive doesnt have the lip)3. Scale of difficulty. 4.5 out of 10 if you watch the video/s and follow the instructions. The difficulty is in removing the plastic base of the old earpad.4. These pads come in a resealable pouch. Inside the pouch are the 2 replacement pads, 2 wet alcohol wipes and paper replacement/installation instructions.5. The instructions come with a QR code which you can scan with your phone for the Wicked Cushions video/YouTube instructions on how to replace the pads.7. I decided to scan the QR code with my phone camera and the video opened up immediately.8. To remove the old earpads, these videos all showed the person working on the replacement using a strong butter stainless steel knife. It's strong enough to use while having a dull side, meaning that the chances of cutting onself whilst performing the replacement is reduced significantly.9. I placed the dull non-serated edge of the knife on the inner part of the plastic edge between the old earpad and the headphone piece.10. Once I did this, I was able to move the dull edge of the knife around the edges of the old earpad and one part of the earpad (with the outer foam and soft inner cover) came loose. The other plastic base (part of the older earpad) remained glued on the rest of the headphone.11. To remove the plastic base that holds the foam part of the old earpad, use the dull non-serated part of the butter knife to remove it. Make sure that you don't scratch the outer visible part of the black part of the headphone. You will most likely scratch the inside of the bare part of the inside of the headphone part that houses the speaker/driver but that part will be covered by the new earpad.12. You will need to use a bit of force to pry the plastic base off the earpad as it is glued on there tight!13. Once the remaining plastic base of the old earpad is off, its time to clean the headphone part where the new earpad is going to rest on.14. I used my fingers to pull off and roll off the remaining glue off the headphone.15. Once all the glue is off and there is no glue residue, dirt or debris on the headphone, then it's time to clean the headphone surface (where the new earpad is going to rest on) with the provided alcohol pad. I also had in stock some First Choose wet dry cleaning wipes which I used, as the provided alcohol pad/s might not be enough.16. Once the surface is clean, then its time to place the new earpad on. Before placing the new earpad, place it (dry test it) on the headphone, seam on the bottom, before removing the adhesive protection cover to ensure that you are placing the correct earpad on the correct side.17. I started installing the earpad that has the indent/cutout where the USB port cable connects to the headphone.18. I removed/peeled off the 3M earpad adhesive using the lip provided (some of the other earpads from other manufacturers don't have this lip) and lined up the earpad, seam on the bottom to the dowels of the headphone and holes on new earpads and pressed the earpad with my fingers firmly all round the earpad to ensure that the inner part of the earpad connects/holds tightly to the outer part of the headphone that houses the speaker.19. I repeated this process for the earpad on the other side, removing the 3M adhesive, aligning the dowels on headphone to the holes on earpads, seam on the bottom and pressed the earpad to the headphone.20. Once the earpads are on, place them on a set of books (or old VHS tapes which I used!) and clamp them on there for 12 hours. My width between earpads was 7.5 (seven and a half) inches.21. Once the 'drying out' clamping period of 12 hours was over, it was time to test the headphones again.22. The earpads work as well as the previous OEM ones. They are comfortable, have similar noise isolation and don't cause discomfort when you use them for a long time.23. They also fit perfectly into the headphone case as they are pretty much the same size as the original.24. I grabbed the Titanium color as it matched the color of the original earpads to a T. No one can notice the difference as the color is pretty much the same. They don't scream 'replacement' or 'aftermarket.'
N**K
Quality
Bought these for my wireless beats the quality is outstanding can't recommend them enough. And they have a great choice of colours and easy to install
Trustpilot
1 month ago
2 months ago