


🚀 Elevate Your Ride with Monroe's Quick-Strut!
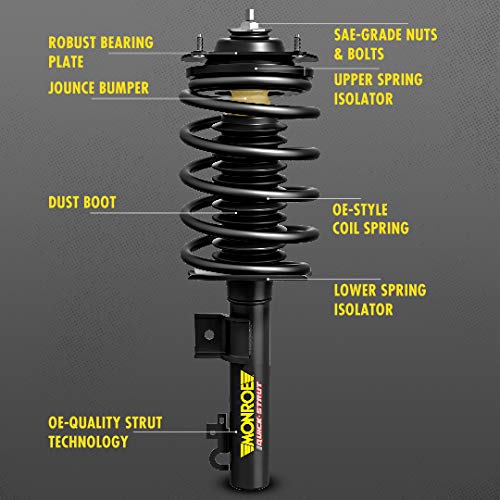
The MonroeQuick-Strut 171661 Suspension Strut and Coil Spring Assembly is a complete, preassembled solution for Chevrolet Impala owners seeking a quick, reliable, and durable strut replacement. Engineered for optimal ride height and vehicle handling, this assembly features OE-quality components and rust protection, ensuring a smooth driving experience for years to come.
| Brand | Monroe |
| Auto Part Position | Front |
| Style | Modern |
| Vehicle Service Type | Car |
| Exterior Finish | Black |
| Material | Alloy Steel |
| Manufacturer | Monroe Shocks & Struts |
| Item Weight | 22 pounds |
| Product Dimensions | 25.3 x 10.1 x 10.6 inches |
| Country of Origin | China |
| Item model number | 171661 |
| Is Discontinued By Manufacturer | No |
| Manufacturer Part Number | 171661 |
| OEM Part Number | 171661 |
A**E
Quick struts
Installed front and rear quick struts on my 99 grand prix coupe myself. You need jack and jack stands, penetrating oil (not necessary but it helps a LOT), torque wrench, 1/2 inch impact gun, 21mm impact deep socket, 15mm socket, and a hammer and small punch.After you jack the car up and secure it with jack stands, remove the tire and take some penetrating oil and oil the two large bolts holding the strut to the knuckle. Then take your 21mm deep impact socket and place on impact gun and take the nut off. You may need an 18mm open end wrench to hold the other side. After you take both nuts off, turn the nuts around and place them back on the bolt. The bolt will not come out by hand so this is where the hammer and punch come in. You don't want to hit the bolt itself. That is why you must put the nut back on and hit that. The bolt won't come all the way out since you had the nut on so take the nut off and use a punch to knock it the rest of the way out. Your punch may get stuck in hole where the bolt was so you may need to move the strut and knuckle to get it out.After both bolts are out, take a 15mm and take off the nuts at the top of the strut tower. Have a jack under the lower control arm to support it so it won't drop far and damage the ball joint. Take a hammer a knock the old strut out off the knuckle and it should come out.When putting the new one in you may need to put the bottom of the strut in the knuckle first, put one bolt through and jack it up to line the top studs in their holes. That is what I had to do but your situation may be different. Either way you will need to play around with it before it goes in. After its in, put the bolts back in and tighten them down. The torque specs on my car is 90 ft lbs for both bolts that go into the steering knuckle and 30 ft lbs for the 3 nuts on the top. Your torque specs may be different so check online for your specs. If you don't have a torque wrench then you need to use a breaker bar and get the 2 bolts as tight as possible. It will be very difficult. I have an impact and even that took about 2 minutes per bolt to draw the bolts all the way in. The nuts on top don't have to be as tight. After everything is tighten down, you are done. Put your tire back on and drop the car. Torque the wheel lugs to 100 ft lbs (again check your cars specs to make sure).If you are changing the rear struts (which I also did), then the procedure is the same. The only difference is you are dealing with a tighter space when trying to remove the bolts from the top struts. You also need remove the rear sway bar end link nut. The nut is 15mm. There is also a 5/8 nut on the back that you will need a wrench to hold when you put the nut back on the shaft link. Trust me, its very easy. If you do one strut, the rest will be a piece of cake. You probably will need an alignment when you're done.My car rides brand new again and it don't sag in the back anymore. I also have new lower control arms and front wheel bearings so that helps too.A few things I want to point out. If you don't have an impact gun you can use a breaker bar to get the large bolts loose. It will be very difficult if not impossible depending on how bad the bolts are rusted. You also may need to replace those bolts if they are really rusty. If you can't get them loose with a breaker bar, find a longer steel pipe that you can put on the end of the breaker bar to loosen it. Also having a second person makes this job that much easier.As stated my car is a 99 grand prix coupe. These struts work on quite a few gm front wheel drive cars so make sure you read the directions carefully. There may be other steps involved for your particular job. Expect this job to take about 2 hours (if you are using an impact and have a second person it may go a little quicker) to do the front and 2 1/2 hours or so for the rears.It may seem intimidating at first but its easy. This was my first time doing this and know that if you take it to a shop it may run you $1000 or more. Have fun and most importantly stay safe.
Y**H
Challenging Install on the 1st One, 20 Minutes on the 2nd One...
The entire procedure only involved 5 bolts on my 1999 Pontiac Grand Prix GTP - 3 on top in the corner of my engine bay & 2 at the bottom where the quick-strut connects to the steering knuckle. Pretty easy to get all the bolts to brake free. I would recommend using WD-40 on the bottom 2 bolts first then work that sh*t in WELL with a wire brush all over the bolts, threads, the other side, etc. Use of a breaker-bar will definitely help. You can get one from AutoZone for $20.The trickiest part was getting the bottom bolts in. I had to read like 5 or 6 reviews then kinda just put them all together to figure it out. The first one was pretty rough. I would recommend to use a small file + sandpaper to scrape off all the crud that builds up on the 2 sides of the steering knuckle after you get the old shocks to come off. Otherwise, the new shock will not slide on too easily over the steering knuckle.So what everybody does is carefully maneuver the assembly in & install the top 3 bolts first. Tighten them down about 95% of the way (at the VERY end, follow torque specs & tighten them down 100%). Next, I had to kinda use both hands to make the steering knuckle go into the slot on the bottom of the shocks - one hand on the steering knuckle, one hand on the shocks. It will kinda line up at this point but the steering knuckle will be MUCH higher than where you want it to be. The best thing to do is grab a screwdriver... If you stand up and push down a couple of times on the steering knuckle, it will start to kinda get lower a tiny bit at a time. Don't expect the holes to line up AT ALL!!! The idea is to be able to line 'em up just enough with repeated pushes in whatever direction you have to go (up, down, side-to-side, whatever) to be able to slide the screwdriver through one of the holes all the way through.Once that's in place, leave it there, grab some Anti-Seize & lube up the 2 BIG bolts well. I had to put some serious effort into grabbing the handle of the screwdriver & pushing it a certain direction while pushing on the caliper/ rotor area with my other hand to get the other hole to line up about 90%. Eventually, you will be able to slide the lubed up bolt through the other hole for the most part WHILE STILL HOLDING THE SCREWDRIVER JAMMED IN ONE DIRECTION WITH SIGNIFICANT MUSCLE EFFORT. If you can get it in a portion of the way, you can grab a hammer & tap it in lightly as you continue to push multiple times on the steering knuckle. You don't have to get the bolt in all the way, just enough so that you have enough threads sticking out the other end so you can begin to tighten on the nut. The nut will pull the entire length of the bolt through at the end. I had to tighten mine to 90 foot pounds.The f*ck1ng 1st one took like 4 hours just to solve the puzzle of how to get the 2 bottom bolts in without dismantling the tie-rod ends & anything else. The 2nd one took about 20 minutes & was a piece of cake. Experience ;D I took the GTP to get some Coronas shortly after. Rides awesome. It noticeably sat higher but everyone says it settles in after a week. I barely felt any of the many road imperfections by where I live. I only did the fronts, back ones I guess seem fine. I would highly recommend a DIY job on this just as long as you can figure out how to install the 2 lower bolts in a timely manner :)
A**.
Quick strut label put on top of Tenneco Spectrum label. Spring popped to side. UPDATED Review
Upon opening the box I immediately notice the spring is popped to the side. I start to look closely and notice wrench/socket marks at top piston center bolt. Then I notice someone put quick strut label on top of Tenneco Spectrum label. I'm bewildered as to why someone would do this.UPDATED Review (Changed 1 star to 4): I decided to update this review. After all, I did by used items on Amazon, that said had "cosmetic damage"... just to try to save 30 bucks or so per strut. So It's my fault for taking the risk doing so. In retrospect, I would have just rather bought new, so I was not left to deal with the surprise, delay, and hassle. I didn't want to return the item. I bought a spring compressor and used that to fix one of them. I called Monroe Tech support about the sticker on top of the other one, he said, that's normal, when they re-purpose stand alone struts from stock. I made a few videos about this install, but I'm not sure when I will get to posting them online. My car drives much better now, these struts are more firm than I expected and I do feel the road quite a bit. I'm so curious how other brands of struts would feel on this car. Over all, I'm satisfied with these struts. Here is a hint: Don't over torque the nuts on struts! I bought a torque wrench, and I glad I did, I use it a lot on properly torquing bolts on my car.
J**.
Soportes
Excelente producto
A**R
Super easy install and fast shipping
Man what a difference these made. Super easy install and fast shipping. Price on here was the best at the time (99$each). Great deal.
T**H
Fast Shipping, saved money on Amazon
I have used Monroe Quick Struts before, they performed well.
P**K
Good bang for your buck
Easy to install. Works great
J**S
Five Stars
Fits my 2002 Grand Prix great, nice ride. Hopefully they last longer than the car!
Trustpilot
2 days ago
1 month ago