Desertcart purchases this item on your behalf and handles shipping, customs, and support to Hungary.
🎧 Drive Your Sound: Mazda-Ready AUX Cable for Next-Level In-Car Audio
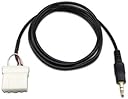
The Goliton AUX 3.5mm Cable is a 2-meter long, matte black audio connector designed exclusively for 2006 and newer Mazda vehicles with external CD changer ports. It enables seamless streaming from MP3 players and smartphones directly to your car’s factory radio, delivering crystal-clear sound for music and calls. Easy to install with a perfect fit, this cable transforms your Mazda’s audio experience while maintaining a sleek, professional look.
| ASIN | B006FFCONA |
| Brand | Goliton |
| Color | black |
| Colour | black |
| Compatible Devices | MP3 Player |
| Compatible devices | MP3 Player |
| Connector Type | Auxiliary |
| Connector type | Auxiliary |
| Current Rating | 1 Amps |
| Customer Reviews | 4.3 out of 5 stars 1,567 Reviews |
| Finish | Matte |
| Item Dimensions | 12 x 10 x 1 centimeters |
| Item Weight | 0.02 Pounds |
| Item dimensions L x W x H | 12 x 10 x 1 centimeters |
| Manufacturer | Goliton |
| Mfr Part Number | E-EMTU-MAUX |
| Model Number | E-EMTU-MAUX |
| Number of Items | 1 |
| Number of Ports | 2 |
| Package Quantity | 1 |
| Power Plug Type | No Plug |
| Specific Uses For Product | Mp3 Phone |
| Specific uses for product | Mp3 Phone |
| Unit Count | 1 Count |
R**N
Parfait pour Mazda 5 de 2007
Le câble est livré dans un sachet. Il s'adapte parfaitement sur le connecteur libre de l'autoradio d'origine de ma Mazda 5 de 2007. Le démontage de l'autoradio se fait a l'aide d'un tournevis cruciforme et ne prends que 5 min. Tuto disponible sur Youtube. Le son du téléphone devient alors accessible sur l'entrée Média (Aux) aussi bien en musique (Spotify) que téléphone (son de l'appel dans les hauts parleurs). Mon tél est un Oppo Reno 2 (Android)
D**O
Funciona perfectamente
Funciona bien. Mi coche es un mazda 3 sportsedan del 2007 y no he tenido ningún problema. Además en Youtube hay vídeos donde explican como instalarlo tu mismo. El problema es que es un poco trabajoso porque hay que desmontar algunas cosas del salpicadero del coche pero eso no es culpa del cable. Además la longitud del cable está muy bien permitiéndote colocar el móvil en el asiento del conductor tranquilamente.
マ**ニ
安い!じゅうぶん!簡単シンプル!
アクセラ BK5Pにて装着しました。MEDIAボタンを押しAUXの表記もされ、音質も問題なく、、AUXのみの為、配線のわずらわしさもなくスマートです。敗戦は中央のドリンクホルダーの四角の場所から出しました。灰皿から出すか悩みましたがこちらにしました。 他社製品、純正品より安いのでオススメです!
A**T
Perfect for Mazda3
Did exactly what was advertised. My Mazda3 now has aux functionality. Great adition.
B**X
Mazda 6 2008 - easy install, great sound
I'll list the good, the bad, and some installation tips. The price of the product is unbeatable, especially since as we've seen with the iphone 5, your iphone integration unit can quickley become obsolete. Just a simple line-in. Works for everything. The sound quality is pretty good. I think a cd sounds better but that's to be expected. But there is no audio feedback from the engine, even when using a basic audio cable extension. The only negative I had was that the cable is a tad short - but that really depends on where you want it coming out. I ran mine through the center armrest box. The cable stretched the whole way, but only had about 4 inches of slack once it entered the bottom of the armrest. If you run yours through your glove compartment or just out the side of the center console (near your legs) you'll be fine. I didn't notice a sound quality difference when I added an extension to mine coming through the armrest. As for installation tips, these will only apply to the 2008 Mazda 6, though I'm sure other Mazda6s of that generation will be similar. Here's a list of tips. 1) Use the GTA car kits video on youtube as a guide. 2) When taking off the 4 front-facing screws that hold in the radio, make sure you get the correct bottom 2 screws. Because I'm tall, I didn't see the actual 2 lower screws and instead unscrewed 2 screws that were holding in the large plastic piece that makes up the armrest. After yanking on the radio for a while and questioning my strength and manhood, I found the correct screws. 3) That being said, if you partially remove that large plastic piece (same piece that makes up the armrest) it actually makes threading the cable much easier. You'll need to remove 5 additional screws (besides the 2 I mistakenly removed). 1 one each side near the driver's and passenger's legs. 1 in the middle near the hand brake, and 2 inside the armrest. Also, disconnect the armrest power outlet. You don't need to take it all the way out, just loose enough at the front so you can thead the audio cable down from the back of the radio. 4) At the bottom of the armrest box you'll need to make the hole bigger to help the cable fit through. The holes are actually a little plastic drain. Just punch out a little bit of the plastic with a lockblade and thread the cable through. 5) To make sure my short cable won't ever fall back down inside, I zip-tied the 4 inches of slack that I had to the little plastic drain at the bottom of the armrest box. It's solid. It sounds complicated but it isn't, trust me. If you are even a little mechanically inclined (like, you set up a Big Lot's bookshelf once) you'll be totally fine. It sounds like there's some improvisation and ghetto-rigging involved, but it's very straightforward. It doesn't take long and it's well worth the effort and money savings. The hardest part is threading the cable down from the radio. Just get a flashlight, stand on your head if you have to, and look for a clear path.
Trustpilot
3 weeks ago
2 weeks ago