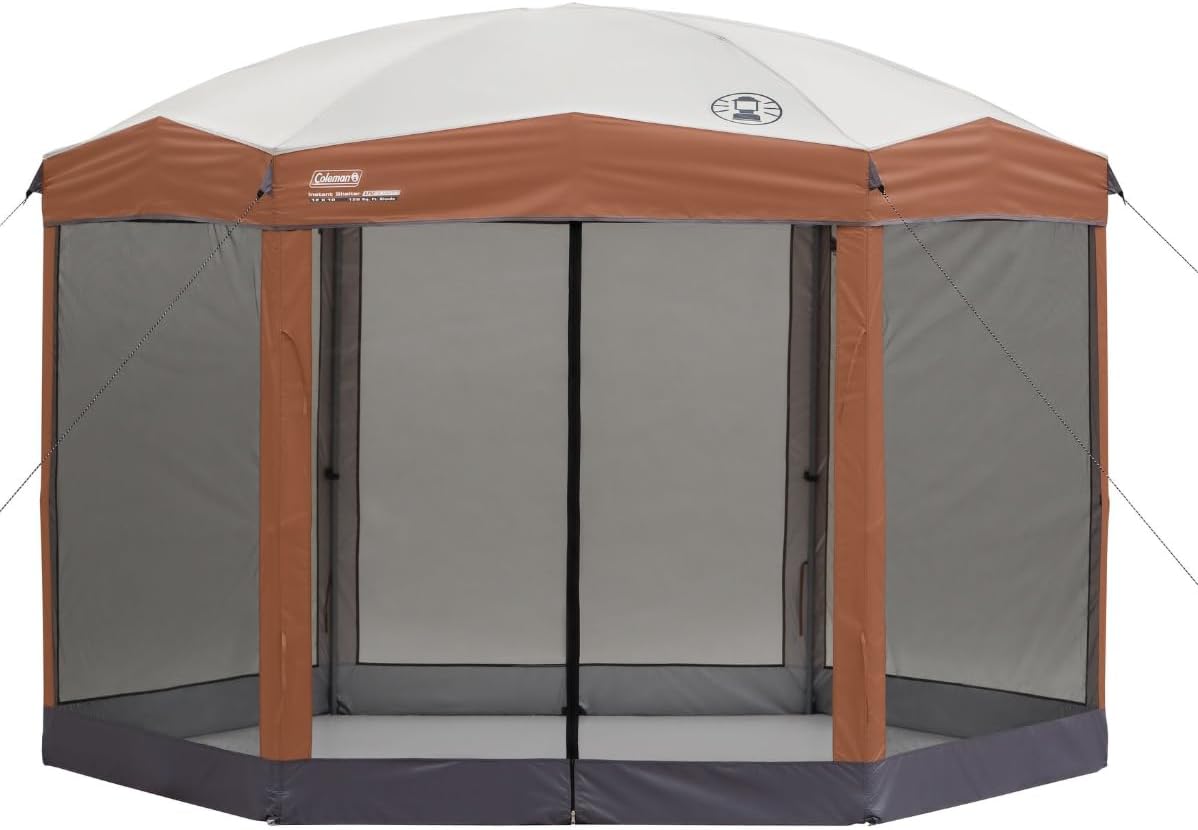
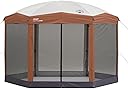


Coleman Instant Screenhouse
Product ID: 216915947
Details
- BrandColeman
- ColourBrown
- Item weight20.5 kg
- MaterialNylon
- Recommended uses for productPicnic
🦟Full bug-blocking mesh walls
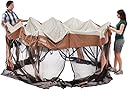
⏱️Instant setup in 3 minutes
☀️UPF 50+ UVGuard sun protection
☀️ Instant shade, zero bugs, all the chill vibes.
The Coleman Instant Screenhouse is a durable, easy-to-set-up outdoor shelter featuring UPF 50+ UVGuard fabric for superior sun protection, full mesh walls to keep bugs out, and a roomy 12x10 ft canopy with an 8 ft 4 in center height. Designed for quick assembly in as little as 3 minutes, it includes a wheeled carry bag for hassle-free transport and storage, making it the perfect companion for picnics, camping, and backyard gatherings.


| ASIN | B00339C3FA |
| Brand Name | Coleman |
| Closure Type | Zipper |
| Colour | Brown |
| Coverage | UVGuard material with mesh walls for bug protection |
| Customer Reviews | 4.4 4.4 out of 5 stars (3,932) |
| Floor Area | 120 Square Feet |
| Frame Material | Alloy Steel |
| Global Trade Identification Number | 00076501052442 |
| Included Components | 12 X 10 Instant Screened Canopy, Wheeled Carry Bag |
| Is Assembly Required? | No |
| Item Dimensions L x W x H | 122L x 35W x 26H centimetres |
| Item Type Name | Screen House |
| Item Weight | 20.5 kg |
| Manufacturer | Coleman |
| Manufacturer Part Number | 2000028003 |
| Material Type | Nylon |
| Max Ceiling Height | 96 Inches |
| Model Number | 2000028003 |
| Number of Guylines | 4 |
| Occupancy | 2 Person |
| Pole Material Type | Alloy Steel |
| Recommended Uses For Product | Picnic |
| Size | Contains PFAS |
| UPC | 076501052442 607983727414 |
| Ultraviolet Light Protection | True |
| Water Resistance Level | Water Resistant |
A**ー
20年以上前から同じ物を愛用しています。設営も簡単、広々、虫も入らず快適です。 古くなった為、2台目を購入。 新しい物はまた素敵です。
R**A
After reviewing many of the other product reviews for other screen rooms, I decided to give this one a try. I'm glad I did. I found this Coleman screen room to be made of very good materials, easy to set up (even for one person) and it functioned very well - even in bad weather. This screen room is well-engineered and there are many different features which make setting up and using it a great experience. The frame, roof and screen all come separately packed. After removing the frame from the [well-made] carrying case, I was able to extend the frame easily to [most of] its full 10 x 12 size on my own simply by allowing one foot to dig into the ground a bit and act as an anchor. I left it partially collapsed simply to make it easier to attach the roof. If you have two people doing this it would be even easier - but this approach worked for me. The roof attaches to the frame with velcro strips that are large and secure (I would later put these to the test in high winds - thank you velcro!) and takes just a few moments. After attaching the roof, I extended the frame to its full 10 x 12 size without any problem. To secure the roof and lock it in place, simply push up on the handles on each leg and the roof locks into its full, arched shape. Having some experience with shade covers, I found this to be remarkably easy to do. Once the roof is on and the frame locked into place, the legs extend to their full height by just pushing in a trigger-like handle and pushing down on the legs. They slide easily and lock into place easily. When all the legs are fully extended, the first thing you'll notice is that the roof is very high. A very tall adult will have no trouble standing in this. This part of the process took less than 10 minutes. Putting up the screen is equally easy. It has two zippered doors in it and it came with both already in the zipped configuration. Unzip one (or both) of the doors and it will become one long screen wall (or two if you unzip both doors). The screen attaches under the roof material where each leg is with two simple hooks. Move from leg to leg pulling the material tight so that the reinforced seams match up with the poles. I found that I had to adjust the position of the legs here and there to make sure that they ended up aligning with the reinforced seams in the screen walls. (it was a good thing I hadn't anchored the legs at this point). The screen has a heavy duty barrier at the bottom (dark grey in the picture) which acts as a heavier barrier against crawling things ( I presume). There's a small hook at the bottom of each reinforced seam that attaches to a hole in the lower part of the leg and which secures the screen. This whole process took less than 10 minutes. The screen room comes with six ~12" steel spikes which are used to anchor the legs. The set also comes with 6 lighter tent stakes which are designed to anchor the screen by passing them through durable cloth loops located at the bottom of each reinforced seam. The whole set up can be anchored by using the small tent ropes that are located at the top of the canopy and attached to the tent stakes. So, here are some of the details about how it worked: 1. It was very roomy and we had no problem sitting six adults in chairs around the perimeter and also had a six foot table along one wall which we set our stove up on. 2. The ceiling is high and we ended up stringing lines to hang clothing - and were still able to get around well. 3. In high winds, I was glad it was anchored down. When I say "high winds" i mean that we got caught in the leading edge of a massive storm in the Appalachians and the winds were throwing around other people's tents. the seal between the roof canopy and the screen didn't open and remained sealed against the rain we had. 4. Rain did blow in from the sides, but the screens did a remarkable job keeping most of it out - it was kind of like a little mist rather than the torrent of rain that the people next to us had to deal with that didn't have screened in protection. 5. In the very heavy rain, the roof - which the manufacturer doesn't claim is waterproof - did great. We experienced very little dripping (and it was a heavy rain) and most of that came through the seams. I plan to apply waterproofing to the seams as a minimum and may just spray the whole roof. 6. Because the screen fits so tightly around the structure, the bottom barrier held its form and kept out some of the water from puddles that had formed around the site. I wasn't expecting that - but it worked. 7. Before and after the rain, the structure provided a great place to sit in the shade, completely free of bugs. As long as you keep the doors zippered, we didn't have any problem keeping out flys, mosquitos and no-seeums. We did note, however, that while we were setting it up, some of those got in before we could secure the screens and so they were trapped in there once we got the screens up. A little bug spray took care of them and we didn't have any issues thereafter. 8. Sitting under the canopy inside the screens, we definitely were able to feel the breezes (reduced) that were in the area. So, it was bug-free and comfortable. Taking this thing down was as easy as it was to set up. There were several people in the campground that came over and wanted to know where I got it and who made it because they had seen one person put this shelter up and one take it down. I chose to leave the roof attached when I folded the structure up so that it would be easy to set up again next time. You'll want to be careful doing this when you put it back in the case because the zipper could catch on the roofing material and tear it. All-in-all, I think this is a great product and would highly recommend it.
J**Y
First off, let me point out this "screened canopy" category includes products that simply are not as durable & long lasting as many of the critical reviewers believe they are/should be. We've owned several of these & will probably buy more. You get a couple of years use...for us in New England mid May through October 1..we're happy. 3 years is a bonanza. Understand this context in my 5star rating. If you think ANY of these products should last longer than that...avoid the category..products not for you. You'll be disappointed. OK, so we were not thrilled with the picture of this Coleman. We've had other slightly smaller, usually 10x10 square shape that frankly looked a lot nicer on our deck & also had a roof vent, just more inviting & better looking. This product frankly in the pic looked like a boring oversized generic tent. But the price was excellent & Coleman is Top Shelf so we said, what the heck it's probably functional & Coleman is great, & the price is $50-$75 less than the competitors, and there's not much available at the physical stores..so we bought. Well, we were VERY PLEASANTLY surprised on ALL counts. First, the canopy looks MUCH better in person, the brown trim looks nice on our brown deck and against the brownish color natural home siding. Also, there is a ton more room inside this..the shape really opens up the inside. Several people can sit comfortably inside with screening in all directions and 2 seperate zippered entries. And it doesn't take up much more space on the deck. Set up was super easy..much easier than with other canopies. It literally pops open. With 2 people it's a 20 minute job. We knew Coleman Quality would be excellent. It IS. The product has held up beautifully for several weeks. We're up high & 1/2 mile from Ocean..so the wind can be very strong. Never knocked it over yet. It's sturdy and has stayed in place. The BEST and most pleasantly surprising thing: we have had two major rain storms ( 2 inches plus each storm)...and the top DID NOT collapse! You might think this is no big deal if you haven't had these type of products..but EVERY version we've had has collapsed under far less than 2 inches of rain. This product's roof was wonderfully designed so the rain just rolls right off --it doesn't accumulate on the top. This may be the single most important differentiator for this product. And I suspect it will greatly add to the life expectancy of the product. So in recap: Price...Great. Quality...Great. Looks...Better Than Expected For the reasons I've stated, with the caveats of the product category itself, I give this my highest rating and highly recommend
A**E
This was a great purchase! We used it camping and were able to raise it in under 5 minutes just before a huge downpour. It isn't watertight of course, but was better than nothing. I bought tent waterproofing spray but never did get to apply it. Per other people's reviews on tents and such I may try the seam sealer as well, since that is usually where water comes through. However, for fair weather it is not necessary at all. The mesh walls were installed much easier than I expected. They just hook on. They were sturdy as well. The frame was sturdy and perfect for around our picnic table. It was a tad confusing taking it down only because we still had a few inches to lower the legs for it to fit into the bag. By some miracle we were able to get everything back into the carry bag and pouch. I never am able to fold tent materials nicely enough to be compact enough for original packaging. Yet I was able to get the cover and walls all into the side pouch. The entire pack is very heavy, even with wheels, but worth it. I was still able to cram it in the back seat of my small car. It is definitely worth the Coleman name. The newer type button to raise and lower the legs are much better than the old metal buttons that are difficult to push and chance pinching. I'm glad for this new addition to my camp gear.
G**L
3 Minutes in 3 steps? Yeah, right. NOT! I think if you had 4 people and rushed like it was a race, maybe. It is not complicated to set up, nor is it hard to set up. We got this Coleman 12 x 10 Instant Screened Canopy a few days ago and decided to set it up and tear it down to look for blemishes, tears, missing parts, etc.... so this was our first time setting it up. It took a minute or so just to unpack it and get things out in the open. First thing we did was spread out the legs and raise it a notch. this took a few minutes by itself. It was easy to do, but for two people and dealing with 6 legs of this canopy, it took a small amount of time. Next we put on the canopy itself and attached it to the poles which again took a few minutes. Then we raised the canopy to almost highest height (again 6 legs) and then we attached the screen. Yes, the screen is yet another separate piece that needs to be attached. Then we raised the canopy to highest height. I am 5'7" and my wife is 5', so if I wanted help, we had to raise it in increments. All and all it took about 15 minutes which still is not too bad but far from 3 minutes (or did they mean 3 minutes for each of 3 steps?). We did not attach the screen to the bottom nor did we stake it, so that would add a solid 5 minutes more. Due to the misleading time to set up was the only reason for loss of a star. if I was able to give it 4.5 stars, i would. The quality is not the quality of a regular pop up gazebo. A person needs to realize this. The canopy top and screened area is the same material that is like our Coleman Weathermaster 10 person tent which we bought several years ago with REAL poles and not the fiberglass ones and the tent has lasted us several seasons with no issues. Since the material of this Coleman Screened Canopy is made of same or similar material, with proper care, we expect it to last for many seasons and since we expected the material to be similar to our tent before we ordered, we were not disappointed. The base/pole system seems to be very good quality and love the handles you squeeze to lower and raise the legs. Another brand gazebo we have is a real bear to setup as you squeeze the pins and I have squeezed my skin by getting it pinched. This Coleman system is definitely easier and safer. The tear down is also far from the 3 minute mark but not a big hassle either. The hardest part was figuring how to fold canopy, which is not square, to be small enough to fit into the bag that is part of the big bag. In other words, Coleman attached a bag unit to the main bag that the pole/frame goes into. It is handy and nice, but makes it a bit bulky. Anyhow, we also had to fold up the screen, which also has to fit with the canopy. We put the screen in first and then the canopy which seem to work ok. Then we put away the farm which folded into itself like gazebos do. Overall, it took about 25 minutes to unpack, setup and tear down without fully attaching the screen to the legs. Not too bad and hope it will go a bit faster as we use it more. Where we camp. there is a lot of dirt and I can see this getting dirty very quick and wonder how the stakes will work in the dirt. The canopy attaches to the stakes from what we can tell and wonder if the stakes will be able to stay in the ground with tension from the screened area pulling up on them. We shall see. In grass, I think it would work fine. The size of this screened canopy is large and it helps that it has 6 sides instead of 4. The best part of this screened canopy is the fact that the sides are straight up and down. We have another screen canopy that is I believe 12' by 12' but that is at the base. By the time you get to the top area, you are lucky to have 9' by 9'. This Coleman canopy specs are the same from top to bottom. Is it truly a 12' by 10'? I doubt it but it could also depend on how you measure it. I mean a 4 legged rectangular canopy that is 12' by 10' would be just that. This having 6 sides, the dimensions can not be measured the same way. I did not measure it, but can say that it is bigger than our 10x10 gazebos and seems to be quite a bit roomier. Overall, I would give this Coleman Instant 12 x 10 Instant Screened Canopy a 4.5 star rating for quality, ease of set up (no 3 minutes though), tear down and the ability to fit everything back into the bag it came in. I would recommend this highly.
Trustpilot
1 month ago
1 month ago