


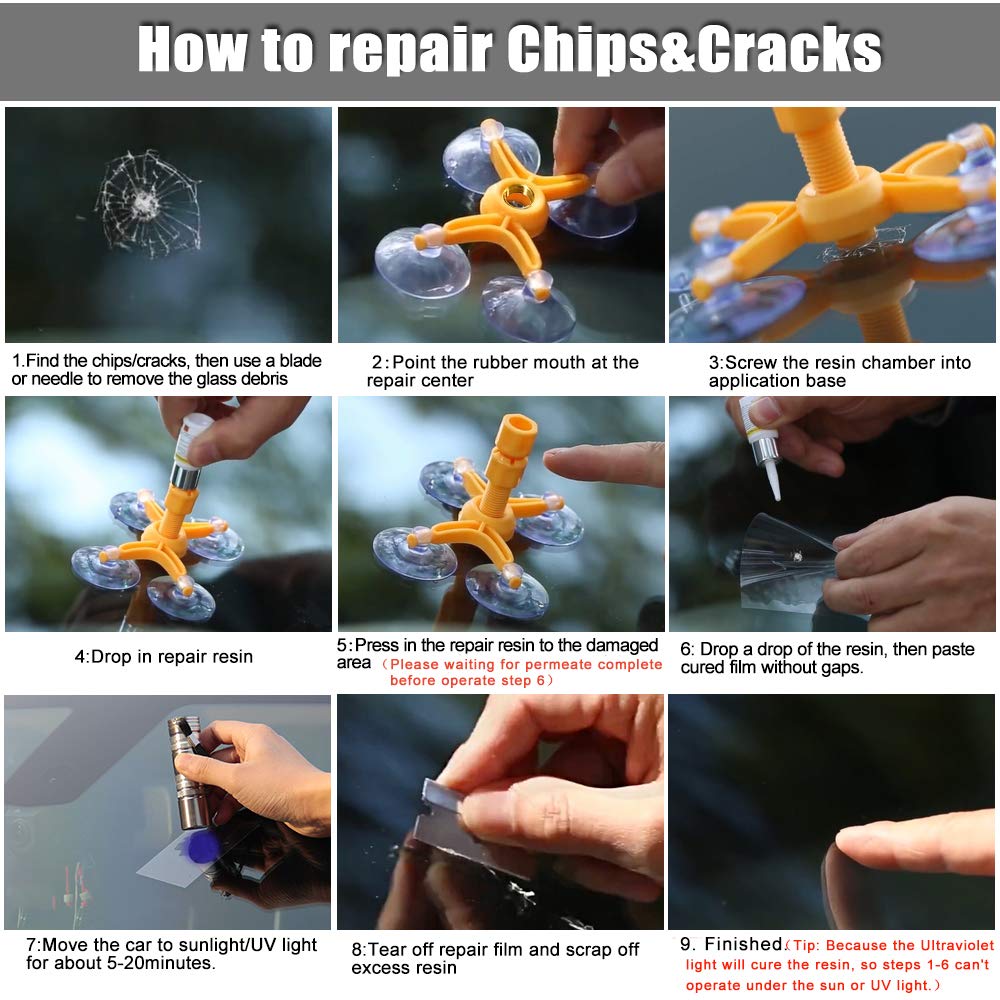

Full description not available
A**R
Amazing, with some slight tweaks!
I was very skeptical that this would work, but I had two half-moon windshield cracks on my 1965 Galaxie’s windshield. It is the original glass, so I want to preserve it. I felt the repair would likely prevent the spread of a crack, but was not confident it would look better. Wow, was I surprised. As others have mentioned, you can still see the “ghost” of the spot, but that distracting black/green color is gone. For $10, I couldn’t be happier.The product was easy to use, and the instructions were better than expected. I will say that it took much longer to fill in the cracks than the instructions indicated. They say something like 6-8 minutes. In that time, I saw almost no change, and almost lost hope. I used a hair drier inside, and that didn’t seem to do much either. What worked for me was repeatedly removing and screwing back in the inner plunger. The instructions do state that you may need to repeat this step, but if my experience is typical, you have to repeat it a lot (20 times?). I waited with pressure and heat on the product to flow, maybe a minute or so each time, and gradually the black color began to disappear. I was lucky that both chips were near the edge of the window, so I could watch from inside and reach out to use the device at the same time. My thought is that there must be air in the crack that gets compressed in the process, but has nowhere to go on a smaller crack, since the syringe is sealed off. I think the back and forth allows the air to be drawn out so that the resin can take its place.Another note. After scraping the resin flush with the glass, the razor blade left a cloudy surface. No used some rubbing compound designed for polishing plastic and a buffer to shine it up. That camouflages the repair much more. You really have to stare at it now to see where the chips were. Great stuff!
M**E
Overall it works well but a little difficult to figure out
I'm really happy with the price and the results. I watched some random videos which were a little helpful, but they were just random people and not very detailed.The biggest point of confusion for me is that they want you to add a couple drops of that glue into the tube after you secure it to the windshield. Because of the angle, you need to insert the end of the bottle all the way in, so how on earth can you tell how many drops are added??At first I was finding that I didn't add enough, but after squeezing the bottle harder the next time, there's so much that it goes all over the place. And I'm not sure what that glue is, but it's probably not safe to get on you. And I don't want to waste it.Anyway, good product, but there's got to be a better way to see how much sealant you're putting in.
A**L
Nothing disappears, but it does a good job
It was fairly easy to use, though there weren't enough of the "uv plastic" setting pieces to do all the cracks at once.Once it dried, it was a bit harder to get off than it sounded, but I hadn't overflowed too much, so it could have been worse.Like so many other brands, pictures show cracks completely disappearing, but not really the case. However, it filled the gaps smoothly and strengthened the windshield because of it.Overall pleased and planning to buy for my dad.
R**E
Good results
Easy to use. I watched YouTube videos on how to use this type of product before starting. The results weren't perfect (user error?) but good. I had a chip in my windshield that had spider cracks. The spider cracks completely disappeared, and the chip is smooth to the touch, but it has a milky color (possibly due to the fact that clouds rolled in while curing??) Nonetheless, it's 99% better than before. Also, i filled a chip that was there when I bought the car. It didn't take the chip away, but it is now smooth to the touch when it wasn't before. I wild purchase again if the need arises.It's hard to see in the photos, but the small cloudy dot is what is left of the new chip that had spider cracks... no more cracks! The next photo is just a fill in from the chip the dealership repaired before I bought the car. I'd say this product did a much better job!
J**.
Worked as advertised
I have experience with a $1500 kit to fix these (years ago). Put my vehicle in the garage to keep out of UV light and took my time. You need the right amount of pressure against the glass. Too much and it closes the cracks, too little and it leaks. Once you think your done, I use my fingers and rub the inside of the windshield at the break - this heats it up to get better flow. I also put pressure on the glass (both sides) all around the break to see what cracks are hiding and to ensure I’ve got resin all the way to the end of the crack.
A**R
I used it on my chip. My chip got smaller but not completely fixed.
It works somewhat but not completely.
S**.
Quick , easy and cheap
This repair kit worked great!It was easy to use and cured fast once I put it in sunlight.There’s plenty resin left to do more repairs.Don’t know how to clean the resin out of the bridge once it has been used so time will tell if I can use it again later or if I have to throw it out. But for 10$ it’s worth it to use it once and throw it away.
A**R
Good value for the money
Not perfect but a lot cheaper than replacing the whole windshield!
Trustpilot
4 days ago
2 months ago
