


๐ Elevate Your 3D Printing Game with Silent Precision!
The DORHEA TMC2208 V1.2 Stepper Driver Module is designed for 3D printing enthusiasts seeking ultra-quiet operation and high performance. With a continuous drive current of 1.4A, peak current of 2A, and 256 subdivisions, this driver ensures smooth and precise control. Its compatibility with existing electronics makes it a cost-effective upgrade, while the included heat sink and screwdriver enhance user convenience.


| ASIN | B082LSQWZF |
| Best Sellers Rank | #254,079 in Industrial & Scientific ( See Top 100 in Industrial & Scientific ) #52 in 3D Printer Interface & Driver Modules |
| Brand | DORHEA |
| Brand Name | DORHEA |
| Color | TMC2208 |
| Customer Reviews | 4.6 out of 5 stars 392 Reviews |
| Item Dimensions L x W x H | 0.8"L x 0.57"W x 0.91"H |
| Item Weight | 0.05 Kilograms |
| Manufacturer | DORHEA |
| Material | TMC2208 V1.2 stepper driver module |
| Material Type | TMC2208 V1.2 stepper driver module |
| Model | D15796-1 |
| Part Number | D15796-1 |
| Product Dimensions | 0.8"L x 0.57"W x 0.91"H |
| Smart Home Compatibility | Not Smart Home Compatible |
| UPC | 701715433649 |
| Unit Count | 5.0 Count |
A**R
Awesome
Absolutely the best thing I did for my Anycubic i3 mega s printer. They work great and holy moly is it quiet.
R**N
Amazingly Quiet!
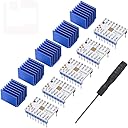
I upgraded my DIY motorized blinds from DRV8825 to the TMC2208 and I am amazed at how much quieter these are than the DRV's. I mean, it is night and day. And they are almost 100% pin compatible. There is no sleep or reset pin on these but the step, direction, enable, microstep, motor,and voltage pins are all the same. One limitation though, the only way to go into full-step mode is to use them in UART, which I didn't want to go to the trouble to do so I am running them in half-step mode and they are still just as quiet. Just apply your VCC to the MS1 pin to get the 1/2 step setup. Also, they probably wouldn't have been a problem but it appeared to me that the solder joints on the top of the pins got too close to the heatsink for my comfort. So I trimmed them with my micro-cutters before applying the heat-sink to give extra clearance, just in case. And you will need the heatsinks. These do get much hotter than the DRV's.
M**S
Problem free drivers
Works great on a MKS gen L board running Marlin 2.x.x. These are setup as standalone drivers out of the box. Make sure to disconnect steppers, power up board and tune voltage first. Pots were decent, a little overshoot when adjusting so go slowly. Would buy these again.
J**B
A recommended upgrade. Even better in UART mode.
I'm using mine with an Anycubic Mega S. They work great. So much quieter. I waited a couple of months to install them as I wanted to be confident in the printer and my own ability. It was pretty easy. I did wind up using some other "low profile" heatsinks (spare raspberry pi kit) instead of the included ones as they were too tall for my fan arrangement. I do recommend upgrading the driver fan. I set the VRef to around .85 volts from the factory 1.1 volt. You can attach the leads of your meter with alligator clips to ground and the adjustment tool and measure and adjust the voltage at the same time as it is present on the potentiometer. The stepper motors run cool with no missed steps. Prints are as good or better. I notice a slight change in the interference pattern created by the print head motion in an otherwise smooth surface on a calibration cube. That makes sense with the step interpolation. Otherwise I can't tell a difference. It's astounding how much it changes with the same motors just using different impulses. Not sure why they don't use them to begin with other than a bit more cost. It's now a better printer. *UPDATE* I eventually switched them from Legacy mode to UART. It's tricky to solder the three little pads, but I got it done. It's definitely worth the effort if you feel comfortable performing the modification.
J**T
Affordable and nearly silent
I added one of these to my FL son Q5 Delta printer to replace the noisy extruder driver that it came with. This worked great. I had to make a change in the Marlin firmware to reverse the direction of the stepper motor but everything worked out great in the end. the heat sinks are pretty beefy and should keep everything cool in the long term and the drivers are 2208 silent steppers...and they live up to their name.
T**.
Love these drivers!
Awesome upgrade! Was running Arduino/RAMPS1.4 with A4988s. Had unrelated issues but decided to change the drivers for TMC2208s. They were a drop in replacement (I use them in legacy mode) and are just fantastic! The noise level is just about zero. The only sound I hear when I print is the retraction and a bit of motor "grind" when the printer homes at the start of a print job. Can easily forget it is on! It is really THAT much quieter!. Note on setting the driver vref, I tried it the way the doc says and was not making any progress. Instead I followed the instructions on a youtube video and it worked great. Connect your volt-meter ground to the board wired ground to the power supply. Connect your positive probe to a small metal screw driver using an alligator clip. Watch the volt-meter readout as you turn the screw driver. Easy. Get the correct sized screw driver and verify it with the board powered off. Practice getting the screw driver onto the "pot" without touching anything else. Then power all. Connect volt-meter and adjust pots. I started with about 0.95 per and had to adjust from there over a few hours of practice prints. You don't mind if the stepper motors get warm but they should not be too hot to hold on to. If you go too low you will get skips so warm motor is OK. Have fun!
L**.
My printer is so quiet now!
This made my 3D printer so quiet now! Drop in replacement, but I did have to switch the stepper wires around because all motors ended up spinning the wrong way. Not the fault of the stepper driver though it just outputs in a different direction than the drivers I had previously.
J**B
Missing key information for linear actuators with Arduino and CNC Shield
It looks like you can add a jumper (waiting for delivery) to take it down to 2 microsteps, which would get me pretty close to the 500, and maybe even 600 RPM since the board I am using should be capable of up to 4000 steps/second with minimal errors. From what I understand, these boards will interpolate whatever steps you enter and translate them to the equivalent @ 256 microsteps. This is how they make things quiet. In other words, if you enter 1 full step on your control board/program, the controller translates that to 256 microsteps and send it to the motor as such. This should mean that you get smooth and quiet operation with any inputs. The problem is that you can't enter one step. The board comes with 8 microsteps as a default and requires a jumper to modify the settings as low as 2 microsteps. If you want the board to take full step inputs, you have to remove and reverse pins, get new heat syncs, and add additional wires with in-line resistors. This modification, called UART mode is also required to be able to switch between two different settings that are better suited for high and low speeds. My problem is that my project is best suited for speeds around 750+ RMP and because of the minimum of 2 microsteps, I can theoretically only get 500 to 600RPM. There are versions of this board already configured for UART at the same price, but I'm not sure if they will work with an Arduino Uno and CNC shield which is what I am using. At a minimum, the description should tell you that the steppers can't be used in full-step mode. If you are running any of the native microstep settings, which is probably fine for 3d printing and such, everything will probably be fine. If you are using them to create quiet, and synchronized linear actuators like I am, I'm actually not sure what to tell you. Maybe look at a different control board and the UART version...
R**L
Works perfectly!
Package arrived in a timely manner and was exactly as described. The TMC2208 stepper motor driver is the quietest and most reliable way to drive stepper motors, IMHO, and I appreciate the inclusion of the small screwdriver to adjust the onboard potentiometer to set the limiting current (Iโm not using these in a 3D printer so I donโt require the included heat sink, but most others will). Note that is is version 1.2 of the board design which means Vref is the top left hole next to the EN pin (on v2 boards itโs the middle hole in the group of three).
Trustpilot
1 month ago
1 month ago