


🚀 Elevate your Pi projects with vibrant touch and plug-n-play power!
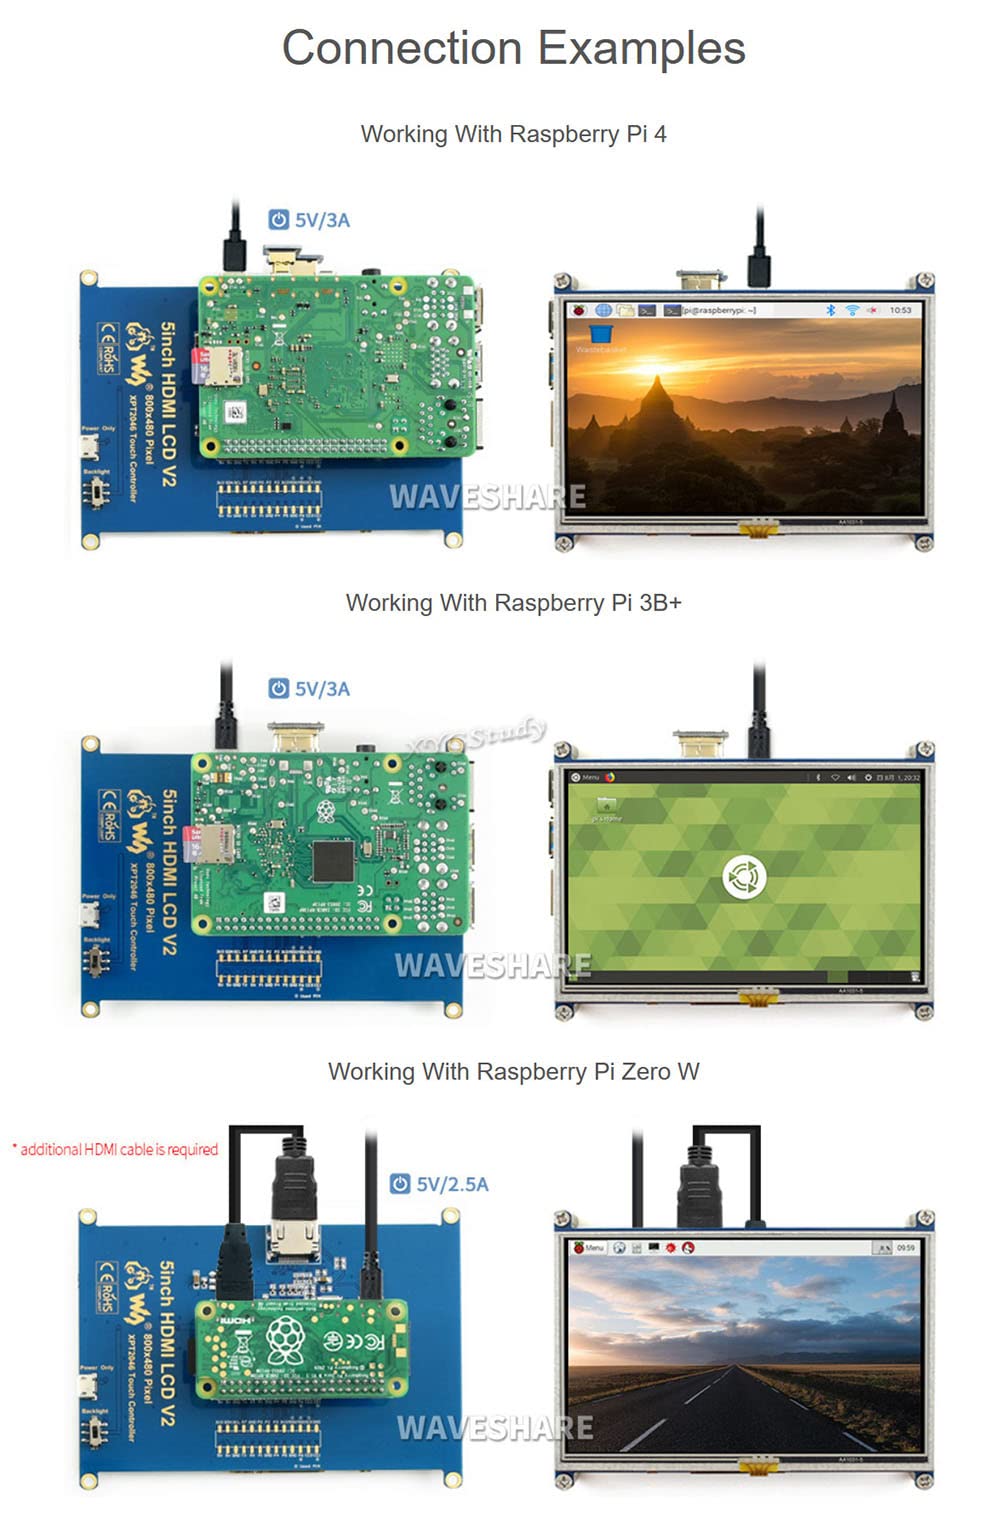
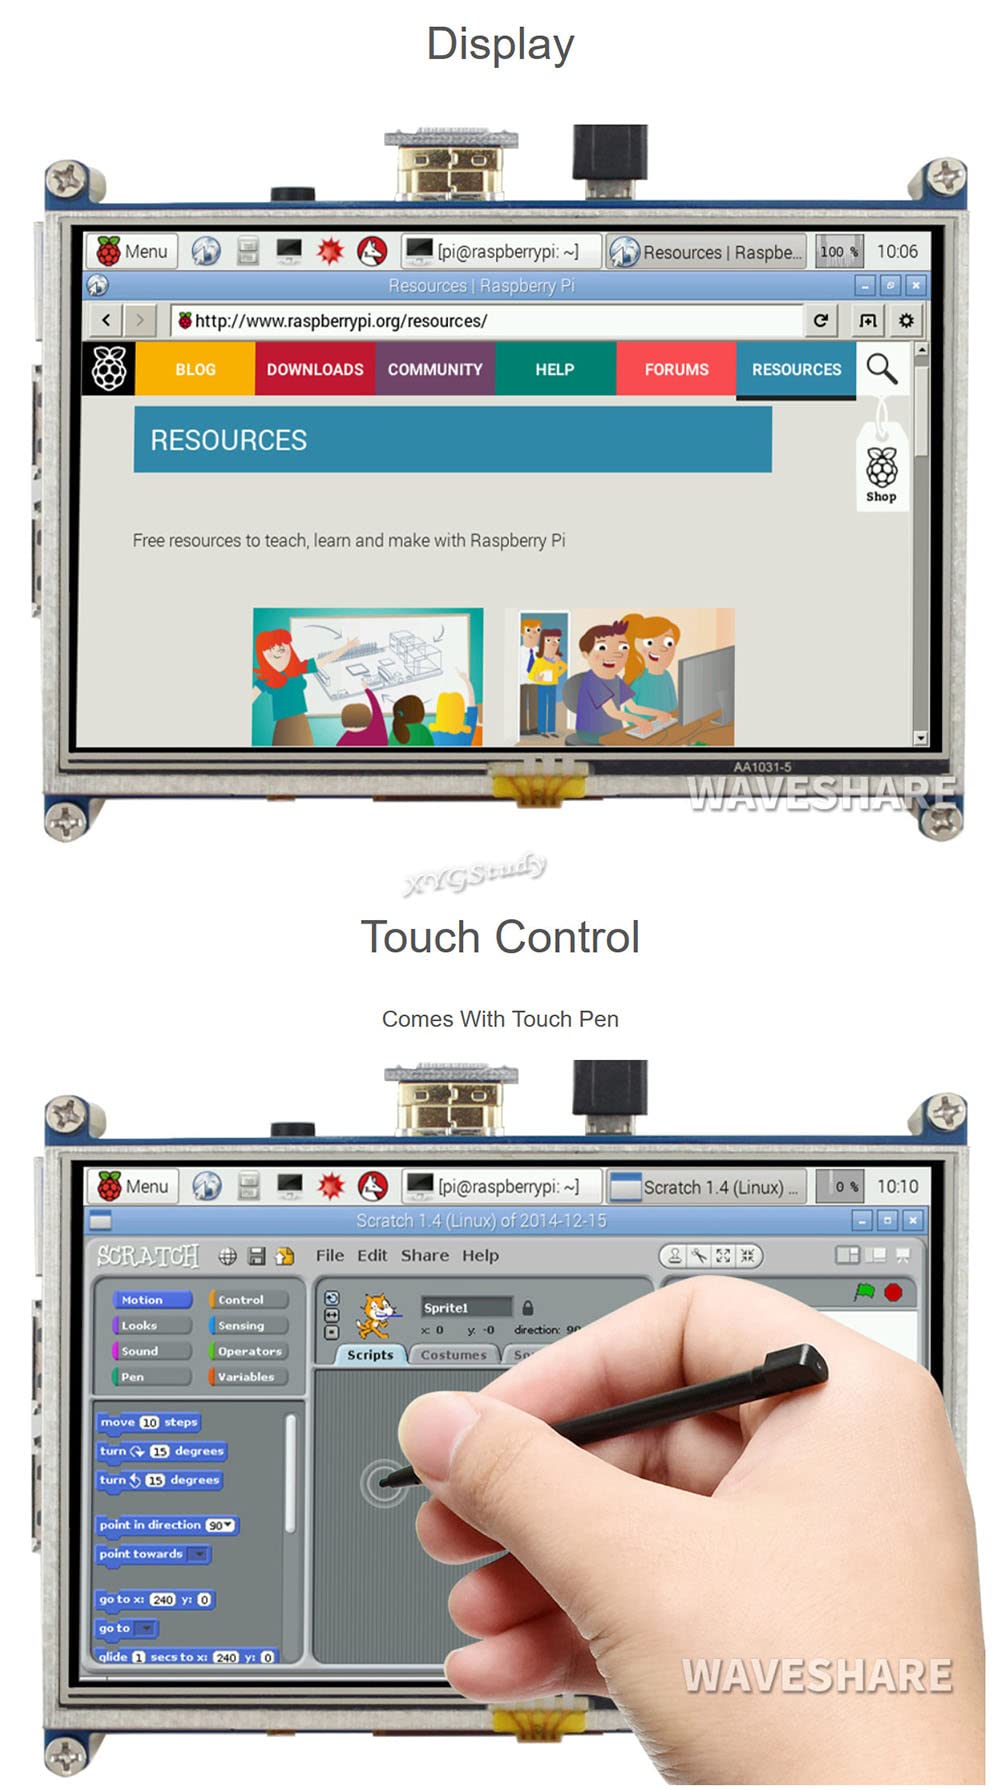
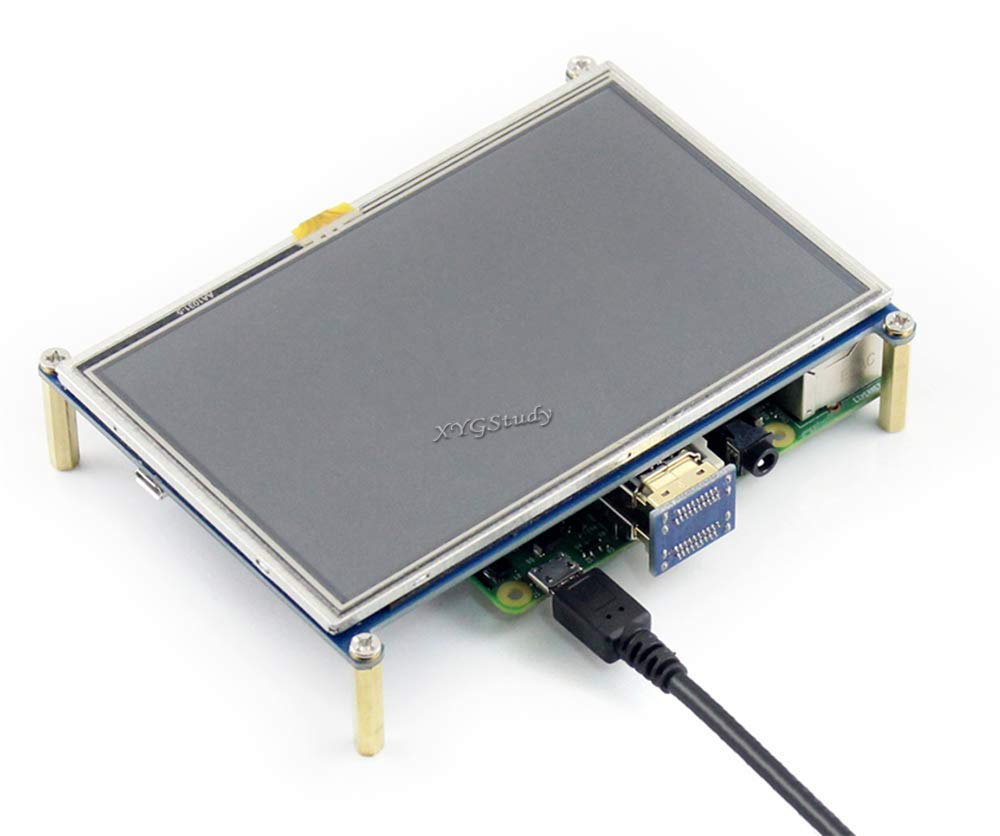
This 5-inch 800x480 resistive touch screen features a direct HDMI interface compatible with Raspberry Pi models 2, 3, B, B+, and A+, offering plug-and-play convenience. It includes power-saving backlight control, high-quality immersion gold plating for durability, and supports multiple OS drivers like Raspbian and Ubuntu. Perfect for professionals and makers seeking a compact, responsive display solution for coding, media, and interactive projects.
| Standing screen display size | 5 Inches |
| Screen Resolution | 800 x 480 |
| Max Screen Resolution | 800x480 |
| Wireless Type | Infrared |
| Brand | XYG-Raspberry Pi |
| Series | 6446774 |
| Item model number | 6446774 |
| Item Weight | 3.2 ounces |
| Package Dimensions | 7.3 x 5.2 x 2 inches |
| Number of Processors | 1 |
| Voltage | 5 Volts (DC) |
| Manufacturer | XYG-Raspberry Pi |
| ASIN | B00U21UA16 |
| Is Discontinued By Manufacturer | No |
| Date First Available | February 27, 2015 |
E**H
Works fine for me via HDMI on RP2 B and Windows 10 IoT Core
Works fine in Windows 10 Iot on the RP2 B, using the HDMI input. I have not yet tried the 26-pin connector GPIO connector. Only had to make minor changes in the config.txt. I also rotated the screen clockwise 90 degrees as well, no issues. I have not yet tried to get the touch working. A few lines of the standard Win IoT startup screen will be clipped, that is expected as it has a static layout - no scaling on this display.Mounting holes are: 115x84mmThe Adafruit 5", which works well too, has 112x84mm mounting holes, 3mm less width.Here are the 3 lines that I added to config.txt, along with some comments. It might be best to just start with that before attaching the display. If you have an issue, just comment out these lines and plug back into your larger HDMI monitor that you started with.Good luck#hdmi_cvt=[width][height][framerate][aspect][margins][interlace]#width width in pixels#height height in pixels#framerate framerate in Hz#aspect aspect ratio 1=4:3, 2=14:9, 3=16:9, 4=5:4, 5=16:10, 6=15:9 7=21:9 8=64:27#margins 0=margins disabled, 1=margins enabled#interlace 0=progressive, 1=interlaced#rb 0=normal, 1=reduced blanking# Added for 800x480 LCD Panels (works for my Adafruit 5" and XYG 5")hdmi_mode=87hdmi_cvt 800 480 60 6 0 0 0# Portrait, rotate clockwise 90 degreesdisplay_rotate=1
D**R
Simple but Capable
This is a simple screen to use. Attach your Raspberry Pi to the screen via the IO pins, then attach the HDMI connector. I was worried at first because, as others have said, I got strange vertical lines on the right side of the screen. I was able to correct this by adding the lines below to the end of the /boot/config.txt file. After adding the lines and rebooting, the video filled the screen and looked great.hdmi_force_hotplug=1hdmi_group=2hdmi_mode=1hdmi_mode=87hdmi_cvt 800 480 60 6 0 0 0# Note that there is no equal sign in the last line.
H**U
Someone answered to a question saying that any HDMI source ...
Someone answered to a question saying that any HDMI source would work. Not true at least with the one that I got; it does not work with a digital camera with hdmi source nor with a regular PC with Windows. It shows only a white screen with a few blue or red lines and does not react to hdmi signal.On top of that, even though I ordered a new one, they delivered a used one. Look at how the screen already has a lot of scratches. There's a green tape only on one corner. Two edges of the green tape itself looks as if someone used fingers to lift it up and put it back on.
J**D
Don't panic just because the kernel did
I'm dinging this a star or 2 more so for the software & documentation than for any hardware characteristics. As for the documentation, it appears to be a machine translation and the grammar & some of the words are not correct usage. One can get through it making reasonable assumptions, but it would be good if they could find someone who understands English to review it before publishing it. See below for the software issues.The display comes with a stylus, which is a nice "touch". :~) The touch screen works fairly well except for the cursor "bouncing over there" all too often when I tap somewhere. I don't know if that is common to other displays or not since I don't normally use touch screens. Basically I hate touch screens, but I am pleased with how well this one is working so far.The screen is pretty much useless in broad daylight and only slightly visible under overcast sky. I have very little experience with mobile devices so I don't know how the expensive stuff fares in that regard. The useful viewing angle seems strange, being farther above (30-40 degrees) than below (10 degrees) perpendicular on the vertical axis, but equal at +/-45 degrees on the horizontal axis. There are many scratches on the screen protector that came on the screen, but I don't dare remove it until I have a replacement protector sheet.I bought this so that I could take my Raspberry Pi mobile, so I bought some Plastruct sheet stock & made a case to hold the Pi with the screen & a set of Eneloop AA cells. I included a slot for the stylus also. :~)Setup issues:The display functioned right off, but not full size, just 640x480. The problems started when the instructions said to "copy the file \software\5inch_HDMI_LCD.tar.gz", which does not exist on the included DVD. I found a version of that on the web & downloaded it but didn't want to use it due to apprehension about where I got it from & the fact that it appeared to contain stuff for an older kernel version. Then I found that another reviewer here had asked about that same thing & got a reply to look at a certain wiki, which said to run the LCD5-show script in the LCD-show directory extracted from the "LCD-show..." tar file in the IMAGE directory of the DVD. I looked at that script & manually did the copying it did & the next thing I knew I was getting kernel panic crashes. After several hours of trial & error I finally discovered that the stuff in the cmdline.txt file was the problem & that none of the changes made to that file by the vendor were necessary to make the display & touch features work. This is primarily why I am rating this at 4 stars instead of 5--that and the fact that their shell script deletes the original files without making a backup copy. It's nice that the vendor tried to make the process of updating an existing installation easy but when doing so they should not permanently delete existing files! If they leave the old files there at least a reasonably Linux-savvy person could recover if there were problems with the new files. Since I did the changes manually I still had the old stuff to revert to while troubleshooting the problem. There was another thing or 2 the shell script did that it didn't need to. With kernel version 4.1.13-v7+ on the Rpi2B the only things I needed to do were change config.txt in the boot partition per the "config-5.txt" file, add the xorg.conf.d files, and install the calibrator package. If you get kernel panic after running their shell script, put the microSD card in another machine & mount the boot partition (even Windows should mount it since it's VFAT). Open the cmdline.txt file and delete everything after "rootwait", save the file & see if that works in the Rpi.Software problems not unique to this hardware:I thought that if I were going to use this very much I would want an on-screen keyboard & was happy to find that Raspbian has one called matchbox-keyboard. It works reasonably well--with a stylus, but there is a problem with it and the pcmanfm in desktop manager mode. When pcmanfm is running in desktop manager mode & the keyboard is run pcmanfm consumes an entire core of cpu--and continues to do so after the keyboard is closed. I found that "spacefm" can also be used as desktop manager so I installed spacefm & use that instead as it does not have that problem.It would also be nice to be able to use xrander panning but I have not gotten that to work.
C**A
Poor quality component
Poor quality. I do not recommend this screen. I sent mine back as soon as I opened the box and saw it. Spend the extra money and buy the official Pi version. It's worth it. I cannot say whether or not it worked and did not want to risk trying it and losing my money.
D**P
Works with Raspberry Pi 3.
Works good with my Raspberry pi 3.First, I had some issue with touchscreen. I used to get kernel panic. But I resolved it by editing cmdline.txt file before reboot. For screen resolution, just follow the instruction to change /boot/config.txtOnce you install don't use sudo ./LCD-show command (otherwise you will get kernel panic), just go to /home/pi/Downloads/LCD-show or whatever your file location. Open that folder and edit "cmdline.txt" file... from "root=/dev/mmcblkop2" -to - "root=/dev/mmcblkop7" . Then you give commands like dpkg.... and last Sudo ./LCD-show. it will reboot without kernel panic and touchscreen will work with raspberry pi 3 (jessie installed via noobs) .It is great small screen.
Trustpilot
1 day ago
2 months ago


